Tuesday, December 4, 2012
tutorial frustrations
I have been trying for years to figure out how to most efficiently post a tutorial.
Word normally doesn't have enough Memory to save all the photos, online tools normally don't allow me to move the photos and shapes as I want them and When I try to convert stuff to be seen on line it always gets changed in the conversion process.
For example when I tried to make a document into a pdf file it did not keep the columns I had formatted in word. And when I upload my power points to google docs all the photos that I rotated go back to being upside down.
Does anyone hove any good methods they can share with me? I have spend so many wasted hours on tutorials that never make it up here on the blog because I can't figure out how to make them look right.

Wednesday, November 14, 2012
Food Storage Soup
Our church group has a blog and about once a month I am a guest writer on it. it is fun and there is a schedule. Mondays we share a recipe, Wednesdays we just write about whatever is on our minds/an insightful quote and Fridays we spotlight a sister from the ward.
Last week I posted and thought I would re-post my recipe here
Last week I posted and thought I would re-post my recipe here
During the storm we used everything we could from the fridge at dinner to try and keep the food from spoiling. But I’ve been wanting to try and make some dinner from my food storage. If the power went out for more than a day, I’d need to have that skill. So last night I found this crockpot sausage and potato recipe and gave it a try. I adapted it to use with my food storage. Here is what I came up with
Sausage & Hash Brown Soup
2 cups Freeze-dried pork sausage crumbles
2 cups dehydrated hash brown potatoes
1/4 cup dehydrated onions
1/2 tsp celery seed
15 baby carrots chopped (or 1 cup dehydrated or freeze-dried carrots)
7 cups of chicken broth (or 7 cups of water with bouillon according to package direction)
Directions:
I just tossed all of the stuff into the crock pot and let it simmer on low for the whole afternoon.
The recipe suggested serving the soup with Cheddar cheese, salt, pepper or milk (You could use dry milk, or evaporated milk)
We liked it just the way it was and loved the idea of having a pot of soup cooking on the stove all afternoon in the event that the power goes out because it could help to keep the house warm.
So try out the soup and add it to the wonderful food storage recipes we got at our mid week activity a few months ago. Thank you to our wonderful Relief Society presidency for making that activity happen. I’m feeling more self reliant already 
Saturday, November 3, 2012
Pumpkin Costume
I've not been very ambitious over the years as far as costumes go for someone who likes to sew and make crafts. I'm not sure why. But When I told Gwen that Toby was going to wear the costume that she wore when she was a baby she got excited and said that she wanted to match him and be a pumpkin too. So I searched online and found a pattern from Martha Stewart for a pillowcase pumpkin. Thanks Martha, it turned out great!


Gwen, the original pumpkin in 2006

Our Pumpkin Patch 2012

Little Sister Dress to Big Sister Skirt
Last year I found this cute dress for my 3 year old to wear for Christmas events.

However the zipper head snapped in two. I hate sewing zippers. But the dress was REALLY nice with a soft lining fabric. So instead of fixing it, I upcycled it to a skirt for my older daughter. (3T dress to size 6/7 skirt) This is how I did it.
The elastic/ribbon bow should make it so you don't have to re-tie the bow with each use. You can sew the bow in place once you know it fits so it always looks perfect, or just double knot it so it can be adjusted as your daughter grows.


However the zipper head snapped in two. I hate sewing zippers. But the dress was REALLY nice with a soft lining fabric. So instead of fixing it, I upcycled it to a skirt for my older daughter. (3T dress to size 6/7 skirt) This is how I did it.
- Cut the dress right under the armpits, leaving a few inches of fabric attached to the top of the waistline.
- Next, cut the zipper out of the dress.
- Turn it inside out and sew the lining fabric to the top of the waist line. (I used pins for this because the lining pops out a bit on the bottom and I wanted to make sure that it would be even)
- Then sew about 4 or 5 inches of waistband elastic to about 15" of ribbon of the same width. Don't forget to burn or melt the ends of the ribbon so it doesn't fray. (My daughter wears a size six, but you might need to adjust the elastic length depending on your daughters size.)
- Turn the skirt right sides out. take the end of your elastic and line it up with the side seem of the skirt on the inside so it is sandwiched between the pieces (keep the ribbon trailing out towards the back.)
- Sew the side seems to secure the elastic. And rrepeat steps 3-5 for the other side.
- Examine your skirt's waistline. You will probably need to use a seam ripper to take apart a few stitches where the waistline meets the back seem where the zipper used to be.
- Stitch the edges of the hole you just made with a blanket stitch so it doesn't fray. But DON'T stitch it closed again!!!
- Thread the ribbon through the hole.
- Repeat steps 7-9 for the other side.
- Pin the ribbon and elastic in place so it stays out of the way for the next step.
- sew the bottom of your waistline to create a casing for the elastic and ribbon to stay in place.
- If there is a gap in the back, sew a panel of fabric to one side of the opening in the back to flap over the opening and keep your daughters undies hidden.


Is that not the cutest free holiday outfit ever? I can't wait for Santa pictures :)
Thursday, October 18, 2012
Macintosh Applesauce Mmmmm
Everyone around here seems to be making applesauce, so we decided that in order to be considered New Englaners we should jump on the wagon and try it out. I had a food mill that my Mom gave me a few years ago and a pressure cooker that I inherited from my grandma so I was excited to finally be able to use them for the first time.


The recipe was so yummy, but we did make a few changes. I put it through a food mill before pouring it into the jars so it would be fine with no chunks. (This step is not needed though because I gave some of the sauce that was left in the food mill to my kids and they said they liked it chunky.)

Then We pressure cooked it for 5 minutes at 5lbs of pressure. Since I didn't know anything about using a pressure cooker I watched this youtube video so I didn't blow up my kitchen.

I was excited that it all worked out and the lids all sealed. I think that next time I am going to try to find a recipe that doesn't have sugar in it.

And here is my helper. My father-in-law, who was such a good sport about helping me in the kitchen and keeping me company.

I think the next time that I make applesauce I will buy smaller jars so that I can hand it out as gifts because it was that yummy :)
Saturday, October 13, 2012
Navy Ball 2012
tonight we went to the Navy Ball for the first time in a since 2009. We had a great time and were so glad that my father in law could come out to watch the kids for us. I of course worried about everything going okay while I was gone but when I got back he told me they were all angles.
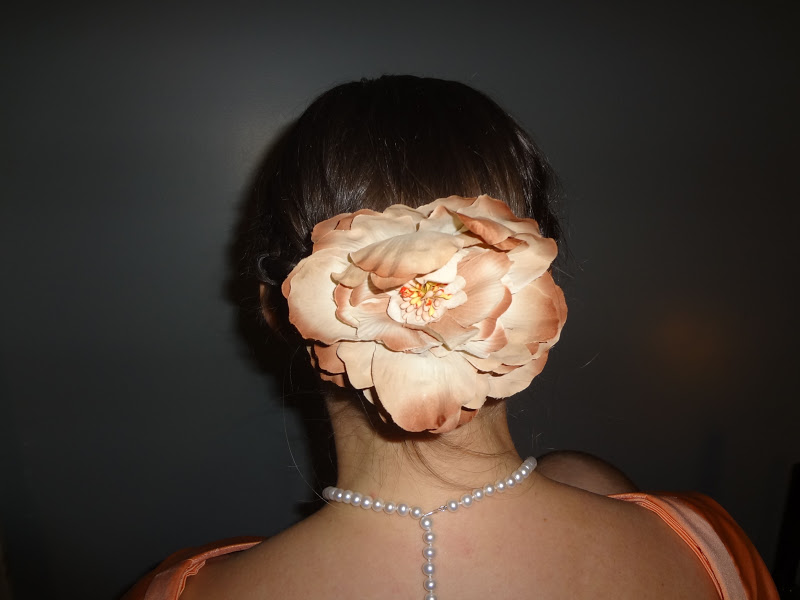
This is the hair do I went with. It's not my favorite that I've ever done, but I think that style wise it went well with the dress and old fashion look I was going for (It was a cold night so I wore a fur cape with it that added to the old fashion look.) If I try it again I think I will twist the hair on the side instead of braid it. I had a hard time feeling like the braids were just right.
http://www.youtube.com/watch?v=rf2oZwSehWQ


Some other hair styles I considered were
http://www.youtube.com/watch?v=4bBblo-8x90
http://www.youtube.com/watch?v=TOTc822hTaM
http://www.youtube.com/watch?v=fyr2FJtYllQ
(I read that you can make your own hair padding by folding some tulle into the same oblong shape as in the video then wrapping it in a hair net.)
http://www.youtube.com/watch?v=O2YYlVuC6_w&list=UUeRF3k69cJnxB87lwk9KbrA&index=4
http://www.youtube.com/watch?v=c5VtLMniWzo
http://www.youtube.com/watch?v=cGsx2f822fs
https://www.youtube.com/watch?v=eOdNneU3djw
http://www.princesshairstyles.com/2014/09/waffle-cone-ponytail-easy-hairstyle.html
This is the hair do I went with. It's not my favorite that I've ever done, but I think that style wise it went well with the dress and old fashion look I was going for (It was a cold night so I wore a fur cape with it that added to the old fashion look.) If I try it again I think I will twist the hair on the side instead of braid it. I had a hard time feeling like the braids were just right.
http://www.youtube.com/watch?v=rf2oZwSehWQ


Some other hair styles I considered were
http://www.youtube.com/watch?v=4bBblo-8x90
http://www.youtube.com/watch?v=TOTc822hTaM
http://www.youtube.com/watch?v=fyr2FJtYllQ
(I read that you can make your own hair padding by folding some tulle into the same oblong shape as in the video then wrapping it in a hair net.)
http://www.youtube.com/watch?v=O2YYlVuC6_w&list=UUeRF3k69cJnxB87lwk9KbrA&index=4
http://www.youtube.com/watch?v=c5VtLMniWzo
http://www.youtube.com/watch?v=cGsx2f822fs
https://www.youtube.com/watch?v=eOdNneU3djw
http://www.princesshairstyles.com/2014/09/waffle-cone-ponytail-easy-hairstyle.html
Wednesday, September 26, 2012

Subscribe to:
Posts (Atom)