Showing posts with label tutorials. Show all posts

Thursday, May 29, 2014

Lots of little things

As we have been getting ready for our move I have been doing a lot of projects
LITTLE PROJECTS-

  • Zipper pouches to keep things in our suitcases organized (we'll be living out of our suitcases for 3 months, so they need to be REALLY organized!)  Here is a tutorial I re-watch every time I have to make one.  (I just loving listening to Debbie Shore on youtube.)
    • Wish I had time to make them super cute like these. Oh well maybe next time.

FINISHING PARTIAL PROJECTS-

  • Sewing modesty panels in lots of my deep v-shirts(I won't want to wear a cami under them in the humidity I will be living in for the next 2 years.
    • I just find a scrap of fabric, hem the top and string a skinny piece of elastic trough.  (if it is bunchy instead of flat the fit is normally better)  Pin and sew into place.
  • Some things look better with a flat panel, but it takes SO long to sew in a flat panel that looks perfectly lined up and like it was original to the garment, so I'd rather Sew modesty panels that I can switch from one shirt to another.  I think they give a little more dimension, and they don't get saggy and show cleavage or Boob when you bend over.

  • My Hubby's uniform patches for his new uniforms

GETTING THE HOUSE READY-

  • yard work (I think I've been doing at least an hour a day for the last 2 months.)
  • donations to the thrift store and friends
  • Eating all the stuff in the freezer and pantry that we have been avoiding but are too thrifty to just toss out.
  • Organizing my sewing area, SUCH a big project.  What to store, what to get rid of, what to take with me...

Luckily our Health Clearances went through this past week so we are officially authorized to go.  (can you imagine not knowing until a month before an overseas move if you are actually going or not!!!)  Hope to get our flight details soon so we can start making more plans

Tuesday, December 4, 2012

simple skirt tutorial

Here is one of the previously mentioned frustrating tutorials.  If you know how to make all the photos stay turned in the right direction through the uploading process PLEASE let me know.  I am going to be teaching some sewing lessons this week and I wanted to be able to send my students the pattern online so they can review it before class, but I want it to look professional.

Simple Skirt Tutorial


Saturday, November 3, 2012

Little Sister Dress to Big Sister Skirt

Last year I found this cute dress for my 3 year old to wear for Christmas events.


However the zipper head snapped in two.  I hate sewing zippers.  But the dress was REALLY nice with a soft lining fabric.  So instead of fixing it, I upcycled it to a skirt for my older daughter.  (3T dress to size 6/7 skirt)  This is how I did it.

  1. Cut the dress right under the armpits, leaving a few inches of fabric attached to the top of the waistline.
  2. Next, cut the zipper out of the dress.
  3. Turn it inside out and sew the lining fabric to the top of the waist line.  (I used pins for this because the lining pops out a bit on the bottom and I wanted to make sure that it would be even)
  4. Then sew about 4 or 5 inches of waistband elastic to about 15" of ribbon of the same width.  Don't forget to burn or melt the ends of the ribbon so it doesn't fray. (My daughter wears a size six, but you might need to adjust the elastic length depending on your daughters size.)
  5. Turn the skirt right sides out.  take the end of your elastic and line it up with the side seem of the skirt on the inside so it is sandwiched between the pieces  (keep the ribbon trailing out towards the back.)
  6. Sew the side seems to secure the elastic. And rrepeat steps 3-5 for the other side.
  7. Examine your skirt's waistline.  You will probably need to use a seam ripper to take apart a few stitches where the waistline meets the back seem where the zipper used to be.
  8. Stitch the edges of the hole you just made with a blanket stitch so it doesn't fray.  But DON'T stitch it closed again!!!
  9. Thread the ribbon through the hole.
  10. Repeat steps 7-9 for the other side.
  11. Pin the ribbon and elastic in place so it stays out of the way for the next step.
  12. sew the bottom of your waistline to create a casing for the elastic and ribbon to stay in place.
  13. If there is a gap in the back, sew a panel of fabric to one side of the opening in the back to flap over the opening and keep your daughters undies hidden.

The elastic/ribbon bow should make it so you don't have to re-tie the bow with each use.  You can sew the bow in place once you know it fits so it always looks perfect, or just double knot it so it can be adjusted as your daughter grows.


Is that not the cutest free holiday outfit ever?  I can't wait for Santa pictures :)


Monday, March 19, 2012

Wednesday, March 14, 2012

Porch Swing cover

For therapeutic reasons, I need to take this opportunity to complain about my landlord. Because he is the reason I had to do this project. (if you want to skip my gripes, don't read the next paragraph.)
He is a nice guy and we liked him when we moved in, but he never has anything positive to say about how we take care of his house and in my opinion we are rock star tenants. He frequently complains about the swing we have at the end of the driveway. We sit on it while waiting for the school bus everyday. For some reason he thought it was ugly and told us every time he came to the house along with his other lists of complaints. At first I tried to brush the issue under the rug and say, "ya, we should do something about that." But the last time he came he tried to tell me that it was so ugly that it was going to drop the property values of the "neighborhood" (We don't live in a development. We live on a rural highway, give me a break! Not to mention the fact that WE PAY YOU TO PUT OUR STUFF WHEREVER WE WANT IT TO BE!!!) I thought I would leave it there FOREVER just to spite him, but after our last snow fall the fabric in the rain cover got a huge hole in it. So I had to admit it was time to make a new cover for it. But the whole time I've been stewing about how much I hate that I have to do this and that he might think I am doing it for him. Sorry for the rant.

Anyway, I measured the swing to find out how much fabric I would need. according to my calculations I needed 3 1/2 yards, but I ordered 4 yards just in case. It's a good thing that I did, because I barely had enough fabric.
  1. I laid the existing cushion and rain cover on the fabric so I could use them as a template instead of calculating the dimensions to cut and then end up short someplace.
  2. After cutting the material for the seat cushion I turned it right sides together and sewed the raw edges together. Then I turned it right sides out. I sewed the edge that I just did into place with a top stitch. At both ends begin and stop your stitching about 2 inches from the edge so that there is room to fold over the edges when we get to that point.
  3. Then I sewed about 3 inches from that so that there would be a little flap hanging down from the bottom of the seat. (That's how the old one was) Leave the first and last 2 inches un sewn like before so they can be folded over when we are ready for that step.
  4. Next I put the cushion inside of the fabric to determine how many inches the flap on the other end can be.
  5. After you sew a flap on the other end, attach some ribbons to the top edge of the fabric. This is one of the features that holds the swing into place.
  6. Make sure to sew all the edge by stitching a box. Also, you are only stitching the middle part of the ribbon to the fabric. This will enable you to use both ends of the ribbon to tie.
  7. Put your old seat cushion into the new cover and smooth everything out. This is now the time to fold over the edges. Work with one edge at a time. Bring the cushion to the edge of the fabric and pull out any ties or Velcro out. Pin the seam with the raw edges folded to the inside.
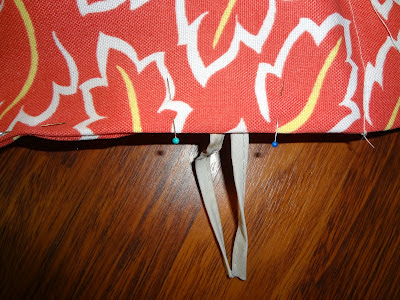
  8. You will be seeing the seams, but you don't want to sew over the ties, they will need to be shifted around a bit after sewing. So just place some pins on either side of the ties to help remind you to stop sewing at those places.

  9. You can see here that I left a gap in the stitching
  10. Pull on the straps so that the cushion gets squished all the way over to the edge.
  11. Repeat pinning and sewing on the other side.
  12. Smooth everything out and place pins down the center
  13. Sew a seem down the center. This it TOUGH to get all that fabric through your machine. I think it messed with my tension a bit too. So be careful.)
  14. Now sew up those holes around the seat's original ties.

Your cushion should look like this

Here is my finished product. I think it is FABULOUS!
I won't go into detail about how to make the rain cover, I'll just say that I examined the construction of the original rain cover and copied it as closely as possible.

I got the fabric online at www.fabric.com
It was outdoor fabric and was only $4 a yard! Plus I found a coupon code online so including shipping it was only $22, The velcro was $6. So I spent $28 on something that would have cost 3 times as much.

Thursday, March 1, 2012

XL overcoat to Maternity coat

I thought about doing a video tutorial for this one, but realized anyone who might try this will be starting with a different product, so it would be easier for me to just type out a general idea of how I did mine to give people an idea of how to do theirs.
I live in the North East and we have COLD winters. So I needed a maternity coat I could wear once my tummy got too big for my regular coat. But I HATE the idea of buying an expensive maternity coat for just a few months. Instead I made one, I went to the thrift store and bought a coat that was too big, but that had potential It was $7. Here I am modeling it in my night gown. Classy right!
BEFORE
AFTER

The coat is fake fur and suede, so there was no lining fabric to deal with. That was one of the things I liked the most about it. It also had these seem lines in the back.

So I turned the coat inside out and marked it with Chalk. I made 2 lines, one at the base of the arm pit and the other a few inches bellow that. (At the time I wasn't sure how far down I wanted to sew, but ended up choosing the top line.)
I pinched the fabric between each seem line in the back and pined them together.
Then I used my sewing machine and sewed from the neckline down to my chalk lines.using the previous seam lines as a guide for my sewing machine foot.

After that I took some ribbon and made a belt out of it. I used grosgrain ribbon because I thought the texture would help it to stay tied well. I folded it in half to find the center and sewed that into the center seam in the back of the jacket so I wouldn't loose the belt. Then I made some belt loops out of some of the extra ribbon and sewed those just a few inches under the armpits.
The jacket was a little tight with all the extra fabric in the back so I cut the extra fabric out. I made a seam allowance of about 1/2 or 3/4 an inch. and stopped cutting about an inch above the bottom of my seam.
I think it turned out cute and I'm not embarrassed to wear it anymore. In fact with the fur cuffs and collar it makes me feel a little bit like a Diva :) I wonder if it will still be cute on me when I'm not pregnant next winter.

Thursday, February 9, 2012

HOW TO gather by hand

HOW TO- attach your thread to your work with a knot

Once your needle is threaded, this is how you attach it to the fabric you want to sew

HOW TO choose your needle

Here is an explanation of the difference between a sewing machine needle and a hand sewing needle

And here is some extra information on choosing your what type of Sewing Machine Needle or Hand Sewing Needle you want.

SEWING MACHINE NEEDLES-
copied from THIS website (I must say that I am a lazy needle changer and I normally don't change my needle unless it is bent or broken. Shame on me.)

The REGULAR SHARP POINT NEEDLE is ideal for all woven fabrics because it helps to produce an even stitch and causes a minimum of fabric puckering. This needle is not recommended for knits, as it has a tendency to "cut" yarns and cause skipped stitches. This needle comes in a wide range of sizes from the finest size 9 to a heavy size 18.

The BALL POINT NEEDLE is specifically designed for knit and elastic fabrics and has a "rounded" point rather than a sharp point. This needle pushes between the fabric yarns rather than "cutting through" the yarns. This needle comes in sizes 9 to 16 and the larger the needle size, the more "rounded" the needle point is.

The WEDGE POINT NEEDLE, which is designed for leather and vinyl, easily pierces these fabrics to make a hole that will close back upon itself. This eliminates unattractive holes in the garment, and also reduces the risk of the stitches tearing the fabric. The wedge point needle comes in sizes 11 to 18. The size 11 needle is designed for soft pliable leathers,while size 18 is designed for heavy or multiple layers of leather or vinyl.

In addition to choosing the right TYPE of needle, it is also important to know the proper needle SIZE for the type of fabric being used. As a general rule you can utilize the following fabric category/needle size information when choosing the needle for your next project.

DELICATE fabrics such as silk, chiffon, voile, fine lace and organdy would need a fine "size 9" needle.

LIGHTWEIGHT fabrics such as synthetic sheers, batiste, taffeta, velvet, stretch fabric, tricot and plastic film would need a "size 11" needle.

MEDIUM WEIGHT fabrics such as gingham, poplin, linen, muslin, chambray, wool crepe, flannel, knits, jersey, wool, chintz, satin, raw silk, wool suiting, stretch fabric and drapery fabrics would need a "size 14" needle.

MEDIUM-HEAVY fabrics such as sail cloth, gabardine, heavy suiting, tweed and heavy drapery fabrics would need a "size 16" needle.

HEAVY fabrics such as denim, overcoatings, ticking, upholstery and canvas fabrics would need a "size 18" needle.

One final needle pointer is always replace dull, bent or nicked needles. If you hit a pin, you should immediately change the needle. A bent needle, even if only "slightly" bent or nicked can cause skipped stitches and can easily cause damage to your fabric by tearing the fabric yarns.


HAND SEWING NEEDLES-
information copied from THIS website

Hand sewing needles are used for different types of projects. Hand stitching is used for some sewing projects, quilting, and crafts such as needlepoint.

how to choose sewing needleMake sure that your needle is small enough to go through the fabric without stretching it or tearing it, and large enough for the eye to accommodate your chosen thread.

how to choose sewing needleUse "sharps" for general-purpose hand stitching. Sharps come in a variety of sizes - the larger the number, the smaller the needle.

how to choose sewing needleThe large size and sharp point of "glover" needles allow you to sew heavy canvas or leather projects.

how to choose sewing needleTapestry needles have blunt points and are used for needlepoint and tapestry projects. The blunt points allow the needle to slip between the canvas mesh without splitting the mesh threads.

how to choose sewing needleUse sharp crewel or embroidery needles instead of tapestry needles when you embroider on a tightly woven, non-mesh fabric.

how to choose sewing needleUse short quilting needles for hand stitching quilts. The shorter needle length allows you to work through the heavy fabric layers more easily than you can with the longer sharps.

how to choose sewing needleSelect a darning needle for mending holes in woven fabrics. These needles are larger in diameter and longer than general-purpose sewing needles which allows you to draw your thread over large gaps in the fabric.

how to choose sewing needleA multi-needle pack offers a variety of needles to choose from when you are unsure of the appropriate needle size for your project.

how to choose sewing needleA thimble or other hand protection will protect your fingers or hands when you hand stitch a sewing project.


Friday, February 3, 2012

How to make a ruffle

How to Make a ruffle-By Bri
Video length 14:14

HOW TO Gather Fabric

How to Gather fabric-By Bri
Video Length 8:29

You will use this technique A LOT on Women and girl's clothing.
It is often used to make
  • full skirt on a dress
  • a skirt
  • apron.
  • sleeves
  • to add extra fabric to make room in the bust area.

HOW TO Hem

HOW TO tear a straight edge

Here is a how to video made by me about tearing a straight edge instead of cutting it. Video length is 1:14
Another tip I forgot to mention in the video
  • Always begin by tearing your raw edge first (Raw edge is also called a salvage). This is because the person at the cutting counter probably didn't cut a perfect edge along the grain of the fabric, and after washing your fabric it will unravel unevenly along the raw edges. So to make sure that your dimensions are correct, always begin by squaring up the side.

Wednesday, June 16, 2010

Ultimate full coverage Bib/Smock

This is absolutely the BEST bib in my book. I can use it on the kids for at least all three meals instead of having to get a new bib for every meal. I call it a FULL COVERAGE bib because it keeps the neckline of their clothes clean, and it is long enough to cover their lap. and it wraps around the sides so everything but the sleeves are covered. I use a really heavy denim-like material that I hunt for in JoAnn's clearance fabric section. I normally find it for $1 or $2 a yard. My Mom made the pattern and shared it with me a few years ago.

This is a template you can use to make your own pattern. You can copy, paste and print it. It's proportions should be 8.5" x 11".
What you will need-
  • 3/4 of a yard denim-like heavy fabric
  • matching thread
  • your sewing machine
  • needle
  • snaps (The ones you can use instead of buttons or velcro. There is a Picture of them in the directions. They can be found in the notions section of your fabric store.)
  • your iron and ironing board.
  • scissors
  • newspaper/pattern making paper
  • my template
  • pen

How to make the pattern-
  1. Print out the yellow pattern template. It is 8.5"x11". So make sure it prints out as such. Cut along the black line.

  2. Now get some newspaper or large paper and cut it to be 18"x24". Fold the paper in half so it now appears to be 18"x12".

  3. Round out one of the open corners with scissors
  4. lay the template on the other open corner and trace
  5. The template is a little too small, so you will need to continue the curve in a downward motion on the fold as shown in the picture below. Cut the paper pattern out.
The bib-
  1. Pin the pattern to 3/4 of a yard of prewashed denim like heavy fabric. Cut out 2 pieces of fabric.
  2. With right sides together, sew around the edge of the fabric leaving a gap at the bottom and at the front shoulder seems. As shown in the photo below.
  3. trim and clip the curves about 1/4" from stitching.
  4. Turn right sides out and press. Stitch around the edges again, closing the gap at the bottom, but leaving the gaps at the front shoulder seams.
  5. Insert the back shoulder into the front shoulder opening and stitch into place. Repeat for remaining side.
  6. Hand stitch the snaps on to the back for a closure.
Now you have a reversible bib :)