For therapeutic reasons, I need to take this opportunity to complain about my landlord. Because he is the reason I had to do this project. (if you want to skip my gripes, don't read the next paragraph.)
He is a nice guy and we liked him when we moved in, but he never has anything positive to say about how we take care of his house and in my opinion we are rock star tenants. He frequently complains about the swing we have at the end of the driveway. We sit on it while waiting for the school bus everyday. For some reason he thought it was ugly and told us every time he came to the house along with his other lists of complaints. At first I tried to brush the issue under the rug and say, "ya, we should do something about that." But the last time he came he tried to tell me that it was so ugly that it was going to drop the property values of the "neighborhood" (We don't live in a development. We live on a rural highway, give me a break! Not to mention the fact that WE PAY YOU TO PUT OUR STUFF WHEREVER WE WANT IT TO BE!!!) I thought I would leave it there FOREVER just to spite him, but after our last snow fall the fabric in the rain cover got a huge hole in it. So I had to admit it was time to make a new cover for it. But the whole time I've been stewing about how much I hate that I have to do this and that he might think I am doing it for him. Sorry for the rant.
Anyway, I measured the swing to find out how much fabric I would need. according to my calculations I needed 3 1/2 yards, but I ordered 4 yards just in case. It's a good thing that I did, because I barely had enough fabric.
- I laid the existing cushion and rain cover on the fabric so I could use them as a template instead of calculating the dimensions to cut and then end up short someplace.

- After cutting the material for the seat cushion I turned it right sides together and sewed the raw edges together. Then I turned it right sides out. I sewed the edge that I just did into place with a top stitch. At both ends begin and stop your stitching about 2 inches from the edge so that there is room to fold over the edges when we get to that point.
- Then I sewed about 3 inches from that so that there would be a little flap hanging down from the bottom of the seat. (That's how the old one was) Leave the first and last 2 inches un sewn like before so they can be folded over when we are ready for that step.
- Next I put the cushion inside of the fabric to determine how many inches the flap on the other end can be.

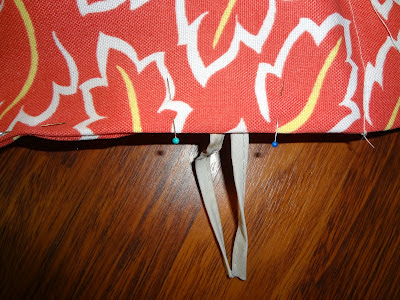
- After you sew a flap on the other end, attach some ribbons to the top edge of the fabric. This is one of the features that holds the swing into place.

- Make sure to sew all the edge by stitching a box. Also, you are only stitching the middle part of the ribbon to the fabric. This will enable you to use both ends of the ribbon to tie.

- Put your old seat cushion into the new cover and smooth everything out. This is now the time to fold over the edges. Work with one edge at a time. Bring the cushion to the edge of the fabric and pull out any ties or Velcro out. Pin the seam with the raw edges folded to the inside.

- You will be seeing the seams, but you don't want to sew over the ties, they will need to be shifted around a bit after sewing. So just place some pins on either side of the ties to help remind you to stop sewing at those places.
- You can see here that I left a gap in the stitching

- Pull on the straps so that the cushion gets squished all the way over to the edge.
- Repeat pinning and sewing on the other side.
- Smooth everything out and place pins down the center
- Sew a seem down the center. This it TOUGH to get all that fabric through your machine. I think it messed with my tension a bit too. So be careful.)

- Now sew up those holes around the seat's original ties.

Your cushion should look like this

Here is my finished product. I think it is FABULOUS!
 I won't go into detail about how to make the rain cover, I'll just say that I examined the construction of the original rain cover and copied it as closely as possible.
I got the fabric online at www.fabric.com
It was outdoor fabric and was only $4 a yard! Plus I found a coupon code online so including shipping it was only $22, The velcro was $6. So I spent $28 on something that would have cost 3 times as much.
It does look Fabulous!! So sorry about the landlord! What a pain...
ReplyDeleteWow oh wow. I love it, now it just needs to warm up so you can use it a little more :)
ReplyDelete