Sunday, December 23, 2012

Knitting Basics to remember.

I've been trying to do some knitting again.

It seems like I always pick it up fast, but then loose steam.  (Thank you to my many teachers over the years)  I think I've learned how to knit from my Mom, a best friend, my Mom's Aunt and now a new friend here in New England.

So after my most recent lesson I went onto youtube to find some videos to help me remember what I'd learned

Long Tail Cast On-

Continental pearl stitch-

Continental Knit stitch

Binding off the needle

garter stitch/ mattress stitch

Or for any knitting tutorial imaginable try Knitting with Nancy Wynn


My friend here in New England got me started on a sweater for Toby.  It is going to be cute, I've been working on it for a month and have the front, back and part of a sleeve done.  But I put it down for a few days so I could make something for the Christmas tree that I have always wanted.

Mini mitten ornaments
I think they turned out great for an amateur knitter


When I was growing up we had a pair of these on our tree and a pair of paper clip iceskates.  They were some of my favorite ornaments to get out every year.  
Maybe I'll make a new pair every year and I can make them more and more detailed as my skills improve.  

Here is the pattern I used

I learned how to do ribbing, save stitches on a needle to work latter and how to make an I chord

And here is an iceskate pattern if I ever get around to them.

I'll post pictures of the sweater when i am done with it.
Next month I have another friend helping me remember how to crochet, I wonder what sort of wonderfulness she will help me to create!

Tuesday, December 4, 2012

simple skirt tutorial

Here is one of the previously mentioned frustrating tutorials.  If you know how to make all the photos stay turned in the right direction through the uploading process PLEASE let me know.  I am going to be teaching some sewing lessons this week and I wanted to be able to send my students the pattern online so they can review it before class, but I want it to look professional.

Simple Skirt Tutorial


tutorial frustrations


I have been trying for years to figure out how to most efficiently post a tutorial.
Word normally doesn't have enough Memory to save all the photos, online tools normally don't allow me to move the photos and shapes as I want them and When I try to convert stuff to be seen on line it always gets changed in the conversion process.
For example when I tried to make a document into a pdf file it did not keep the columns I had formatted in word.  And when I upload my power points to google docs all the photos that I rotated go back to being upside down.
Does anyone hove any good methods they can share with me?  I have spend so many wasted hours on tutorials that never make it up here on the blog because I can't figure out how to make them look right.

Wednesday, November 14, 2012

Food Storage Soup

Our church group has a blog and about once a month I am a guest writer on it.  it is fun and there is a schedule.  Mondays we share a recipe, Wednesdays we just write about whatever is on our minds/an insightful quote and Fridays we spotlight a sister from the ward.

Last week I posted and thought I would re-post my recipe here


During the storm we used everything we could from the fridge at dinner to try and keep the food from spoiling.  But I’ve been wanting to try and make some dinner from my food storage.  If the power went out for more than a day, I’d need to have that skill.  So last night I found this crockpot sausage and potato recipe and gave it a try.  I adapted it to use with my food storage.  Here is what I came up with

Sausage & Hash Brown Soup
2 cups Freeze-dried pork sausage crumbles
2 cups dehydrated hash brown potatoes
1/4 cup dehydrated onions
1/2 tsp celery seed
15 baby carrots chopped (or 1 cup dehydrated or freeze-dried carrots)
7 cups of chicken broth (or 7 cups of water with bouillon according to package direction)

Directions:
I just tossed all of the stuff into the crock pot and let it simmer on low for the whole afternoon.
The recipe suggested serving the soup with Cheddar cheese, salt, pepper or milk (You could use dry milk, or evaporated milk)
We liked it just the way it was and loved the idea of having a pot of soup cooking on the stove all afternoon in the event that the power goes out because it could help to keep the house warm.
So try out the soup and add it to the wonderful food storage recipes we got at our mid week activity a few months ago.  Thank you to our wonderful Relief Society presidency for making that activity happen.  I’m feeling more self reliant already :)

Saturday, November 3, 2012

Pumpkin Costume

I've not been very ambitious over the years as far as costumes go for someone who likes to sew and make crafts.  I'm not sure why.  But When I told Gwen that Toby was going to wear the costume that she wore when she was a baby she got excited and said that she wanted to match him and be a pumpkin too.  So I searched online and found a pattern from Martha Stewart for a pillowcase pumpkin. Thanks Martha, it turned out great!


Gwen, the original pumpkin in 2006

Our Pumpkin Patch 2012


Little Sister Dress to Big Sister Skirt

Last year I found this cute dress for my 3 year old to wear for Christmas events.


However the zipper head snapped in two.  I hate sewing zippers.  But the dress was REALLY nice with a soft lining fabric.  So instead of fixing it, I upcycled it to a skirt for my older daughter.  (3T dress to size 6/7 skirt)  This is how I did it.

  1. Cut the dress right under the armpits, leaving a few inches of fabric attached to the top of the waistline.
  2. Next, cut the zipper out of the dress.
  3. Turn it inside out and sew the lining fabric to the top of the waist line.  (I used pins for this because the lining pops out a bit on the bottom and I wanted to make sure that it would be even)
  4. Then sew about 4 or 5 inches of waistband elastic to about 15" of ribbon of the same width.  Don't forget to burn or melt the ends of the ribbon so it doesn't fray. (My daughter wears a size six, but you might need to adjust the elastic length depending on your daughters size.)
  5. Turn the skirt right sides out.  take the end of your elastic and line it up with the side seem of the skirt on the inside so it is sandwiched between the pieces  (keep the ribbon trailing out towards the back.)
  6. Sew the side seems to secure the elastic. And rrepeat steps 3-5 for the other side.
  7. Examine your skirt's waistline.  You will probably need to use a seam ripper to take apart a few stitches where the waistline meets the back seem where the zipper used to be.
  8. Stitch the edges of the hole you just made with a blanket stitch so it doesn't fray.  But DON'T stitch it closed again!!!
  9. Thread the ribbon through the hole.
  10. Repeat steps 7-9 for the other side.
  11. Pin the ribbon and elastic in place so it stays out of the way for the next step.
  12. sew the bottom of your waistline to create a casing for the elastic and ribbon to stay in place.
  13. If there is a gap in the back, sew a panel of fabric to one side of the opening in the back to flap over the opening and keep your daughters undies hidden.

The elastic/ribbon bow should make it so you don't have to re-tie the bow with each use.  You can sew the bow in place once you know it fits so it always looks perfect, or just double knot it so it can be adjusted as your daughter grows.


Is that not the cutest free holiday outfit ever?  I can't wait for Santa pictures :)


Thursday, October 18, 2012

Macintosh Applesauce Mmmmm

Everyone around here seems to be making applesauce, so we decided that in order to be considered New Englaners we should jump on the wagon and try it out.  I had a food mill that my Mom gave me a few years ago and a pressure cooker that I inherited from my grandma so I was excited to finally be able to use them for the first time.

 I got a half bushel of apples at a local farm stand and it ended up being way more than I could use.  I had time to make 6 quarts of applesauce while the kids were in school and I still ended up with enough apples to make 2 more batches of the recipe.
The recipe was so yummy, but we did make a few changes.  I put it through a food mill before pouring it into the jars so it would be fine with no chunks.  (This step is not needed though because I gave some of the sauce that was left in the food mill to my kids and they said they liked it chunky.)

 Then We pressure cooked it for 5 minutes at 5lbs of pressure.  Since I didn't know anything about using a pressure cooker I watched this youtube video so I didn't blow up my kitchen.

I was excited that it all worked out and the lids all sealed.  I think that next time I am going to try to find a recipe that doesn't have sugar in it.

 And here is my helper.  My father-in-law, who was such a good sport about helping me in the kitchen and keeping me company.

 I think the next time that I make applesauce I will buy smaller jars so that I can hand it out as gifts because it was that yummy :)

Saturday, October 13, 2012

Navy Ball 2012

tonight we went to the Navy Ball for the first time in a since 2009.  We had a great time and were so glad that my father in law could come out to watch the kids for us.  I of course worried about everything going okay while I was gone but when I got back he told me they were all angles.
This is the hair do I went with.  It's not my favorite that I've ever done, but I think that style wise it went well with the dress and old fashion look I was going for (It was a cold night so I wore a fur cape with it that added to the old fashion look.)  If I try it again I think I will twist the hair on the side instead of braid it.  I had a hard time feeling like the braids were just right.

http://www.youtube.com/watch?v=rf2oZwSehWQ


Some other hair styles I considered were
http://www.youtube.com/watch?v=4bBblo-8x90
http://www.youtube.com/watch?v=TOTc822hTaM
http://www.youtube.com/watch?v=fyr2FJtYllQ
(I read that you can make your own hair padding by folding some tulle into the same oblong shape as in the video then wrapping it in a hair net.)
http://www.youtube.com/watch?v=O2YYlVuC6_w&list=UUeRF3k69cJnxB87lwk9KbrA&index=4
http://www.youtube.com/watch?v=c5VtLMniWzo
http://www.youtube.com/watch?v=cGsx2f822fs
https://www.youtube.com/watch?v=eOdNneU3djw
http://www.princesshairstyles.com/2014/09/waffle-cone-ponytail-easy-hairstyle.html

Wednesday, September 26, 2012

My hubby is working with the boy scouts in our area and had a court of honor tonight.  So I made some cookies for him to take.  I was excited when I thought of the gingerbread scout idea.  But I think they look more like Chewbaca from Star Wars than a boy scout.  Either way, they were both yummy :)

Sunday, August 19, 2012

Garden's bounty & Summer Nightgown

I've posted in the past about my gardening failures and how I have a brown thumb.  Most of my gardening efforts since my last post have proved to fall far from what I had hoped.  So I guess that most of my gardening efforts can be categorized more in the exercise category because weeding and planting often makes me sweat and occasionally I'm sore the next morning.

So for Christmas my wonderful Mother-in-law got me a special planter that is supposed to be fool proof.  (It is self-watering and called an Earth box.  Check it out if you are as poor a gardener as I am.)  I thought carefully about what I should plant in it, something easy to grow, I went with beans.  Today we finally picked them...

...washed and cut them...

...and ate them for dinner :)
(I was hoping to can them, but we barely had enough to satisfy 4 people.) 


 Another thing I wanted to share today was this nightgown pattern.  

I can't remember if I have ever posted it before.  My girls LOVE this night gown.  They have these matching ones and then I let them both choose a second fabric from my collection and I made them each a second nightgown from the fabric they picked.

I think that what they love the most about them is that they are

  1.  Cute
  2. Made of breathable cotton fabric
  3. The gathered part at the top is an elastic casing so it is supper easy for them to pull the nightgowns on and off.
HERE-are the instructions
HERE-is the arm hole pattern piece
HERE-are the dimensions for the fabric needed

I keep wanting to make some more with the rest of my extra fabric but I have run out of bias tape and need to buy or make some more so that I can donate some dresses to the website.  But when I finally make them you can be sure I'll post about it again.  Also, I am thinking that I should make a sleeve pattern to go with the dress because my girls want to wear these nightgowns as dresses around town, but I'm a stickler on modesty, so I always make them change.  I think I might try to combine this pattern with the flutter sleeve top I just posted about.  If I come up with something that looks good, I'll share it and make a tutorial on it if I can find the time.
-Busy Bri

Wednesday, August 15, 2012

I had a left over scrap of the border fabric from Amelia's Butterfly quilt and wanted to do something with it.  I have been wanting to try a summer top pattern that I found online, so I figured I'd finally do it.  The Tutorial is HERE and it is by Candace at Sparkle Power.  

 I think it turned out supper cute, My scrap was just a little too short according to her measurements so I used ribbon to make the elastic casings and to cover the raw edge on the hem and sleeves.  I think it made it supper cute.

Sunday, August 5, 2012

Butterfly quilt

I saw this quilt on line last year and fell in love with it.  So I got some blue fabric and started collecting my scraps to make the butterflies.  Sadly, I am not so good at piecing together blocks.  They ended up to be all different sizes and there was no way I was going to be able to sew them into the quilt that I wanted.  I was frustrated that I put so much wasted time into it and money for the fabric.
If anyone is better than I am, here is the link.  The pattern is called Frolic'n Butterflies.

But last Month I came up with a solution where I could salvage a bit of what I lost.  Instead of making a pieced block, I could make an un-pieced block and add the butterfly to the top.  I LOVE how they turned out.  So cute and 3 dimensional.  So fun for a baby to pull on and chew.

I started with a pattern for the butterfly that I made myself.  I guess it is sort of shaped like a cloth diaper.  (But much smaller)  I cut out a front and a back, sewed right sides together with a 1/4" seem allowance, leaving a gap at the bottom.
 Then I clipped the curves and corners, turned it right sides out, and pressed into place.
Next I folded the fabric so it looked like wings and basted them by hand.
After that I took the quilt top to the sewing machine and sewed my butterflies onto the white blocks.
Once I made my quilt sandwich I tied the butterflies with brown yarn to look like the body of the butterfly.

If I had more time I would have liked to have put a brown binding around the edge of the quilt, but with a new baby at home I just didn't have time to go out to the fabric store before it was time to give it away.
The blanket found a new home in the arms of one of my friends out here in New England.  She had a baby just about 1 month after my Toby was born and I took the blanket to her when I went to meet her beautiful new baby.  I hope you like it little Amelia!

Wednesday, July 25, 2012

I'm so proud of myself today. 
Why you ask?  
Because I de-cloged the bathroom sink all by myself.  

Maybe that is not a big deal to some people, but I've never known how to pull that stopper thing out and clear the drain.  So I you tubed it, it was really easy.  If that has been on your to-do list and never gets done because you don't know how to do it, check out this video.
-Bri

Monday, June 18, 2012

Toby's Blanket

I am done with Toby's Baby Quilt!  I know I said this about the last boy quilt I made, but I think this is my favorite quilt ever.  I love how the blocks sort of play tricks with your eyes so it looks like 1/2 the blocks have a red frame and the other 1/2 of the blocks don't.  
I think that it is perfect for a baby who is due to be born between Memorial Day and the 4th of July.  And I think it will go with a wide variety of bedroom themes like: cowboys, military, all American...
He will get lots of use out of it as a play mat while he's little.  (I never keep my floors clean enough for a baby, so I like to have big blankets to sit my babes on to play with toys before they are mobile.)  And then when he is a little older it will be a perfect bedspread for his toddler bed.  

Another thing that I LOVE about the quilt is that it will always remind me of my baby shower.  The ladies at church wanted to give me a baby shower and I told them that I really didn't need a lot of stuff.  So we tried to come up with an idea of how we could still celebrate the baby's arrival, without people bringing me a bunch of gifts that I would have appreciated but honestly didn't need.  So I figured we could have a quilting circle for the shower.  It was great, especially because actually quilting the quilt is my most hated part of making a quilt.
I made sure to bring the binding I was going to use for the edge of the quilt and passed it around with a washable marker and had everyone sign their name on it.  Then when I went home I embroidered over the names so I can always remember who helped me make the quilt.  I even let my daughters sign their names to it and had them help me with a few stitches.

I got the quilt pattern here and found all my plaid fabric for my star squares at the thrift store.  A boy's long sleeve shirt gave me just enough fabric to make about 6-8 squares from each plaid.  I don't know if I'd go any smaller than a size 5T, but the size 6-12's had enough and they were less expensive than the men's shirts.  So I just searched the racks for red or blue plaids that were cheap and felt like strong fabric.
I'd love to make one of these again.  Who's going to give me an excuse to make one?

Friday, June 1, 2012

Bookmark Gift for Teachers


Today is Gwen's Kindergarten teacher's last day of school because she has surgery on Monday.  So we made up a special gift for her.  We made a bookmark for all the reading she will be doing this summer while she recuperates.  On one side I made some lines on the paper to help Gwen write straight and she wrote 
"Thank You for teaching me to read and write.  Love, Gwen"


Then on the other side I had her color a picture and I printed out a photo of her from the computer.  (The one on the right)  I glued the written page and the picture page to a red piece of paper that I cut to be about bookmark size.  I laminated it and punched a hole in the top.  Then ran a ribbon through the hole.  We will give it to her today with a homemade treat :)

While I was putting it together I realized that it was difficult to erase the lines I made without erasing her letters.  So I found THIS bookmark template online.  It had some extra stuff on the top that I didn't like, so I put a white text box over the stuff I didn't like and then copy and pasted the photo of Gwen into the text box.  (The bookmark on the left)  I will print up a bunch of the lined ones for her to give out to her gym teacher, music teacher, art teacher... and we will hand them out on the last day of school.

Saturday, May 19, 2012

Fitted Crib Sheet

I followed a tutorial I found here to make a fitted crib sheet.  We have some friends that gave us some boy baby bedding that is going to go great with Toby's new room.  But I knew that 1 fitted crib sheet was not going to be enough.  So I browsed my thrift stores for a sheet that I could use as fabric and found one for $2.  Then I got some elastic at the fabric store for $1.49.  So that, plus a little bit of my time, I now have an extra crib sheet for only $3.49.  Not bad if you ask me.  

I wanted to take a photo of the underside to show you that yes, it actually does fit and fit well.  When I attached the elastic to the first corner of the sheet I was seriously doubting if the tutorial was going to give me the results I wanted.  So the second corner I came up with my own system and made a casing out of bias tape and threaded the elastic through the casing.  When I compared the 2 corners, I realized the first one was just as good and stretchy.  So I stuck with the fast way that is shown in the tutorial for the remaining 2 corners.  So if you doubt like I did, continue on and trust in the system :)
 And just for fun, here is a shot of Toby's room so far.  It is still basically the office/guest room.  But I do have the rocking chair in there along with the new toy box/attoman and thick chair pad.  I'm hoping the new pad will make it more comfortable to nurse in.  Otherwise, I think the chair is finally going to be donated.
  In the past we have set up the crib and all the baby stuff before our helpers come to the house after baby's arrival, and I hate that I am always going into the guest room to get out the baby clothes and I'm sure they hate that between the crib and the airmatress they are sleeping on, there is no floor space left in the room.  So this time I'm going to make setting up the nursery part of my helper's job.  I hope my dad doesn't mind that little item on the to-do list for the last day of his visit :)
But I figured the baby stays in our room for the first 3 months anyway, so what's the point of setting the room up months ahead of time when it would be so much more comfortable for our guest without the crib.


Camo Diaper Bag

We had a very busy week, so today was a lay around the house kind of morning.  The girls were behaving better than usual and entertaining themselves, so I got something on my "getting ready for the baby" to-do list checked off my list.
I made a diaper bag by following this tutorial.  It was fairly good, but I was glad there were photos along with the words so I could try to interpret some of the steps that were a little confusing to me.

It ended up begin much smaller than I thought it would be, but I was able to make it completely out of scraps that I had laying around in my craft area :)  I think it will be a great bag for Daddy to use because it is actually made out of the official dessert Camouflage uniform fabric that they use on Daddy's uniform.  I had picked it up at Wallmart several years ago for $3 a yard.  (Don't ask me how Walmart got the same material as the military.) I think I might even make my way over to the Navy exchange the next time I'm on base and see if they have any Sea Bee patches that I could put on the front pocket.  

In my excitement I forgot to wash it before I took the photos, so there are a few red lines on it from when I was putting it together, but I will wash it and it will look great.  

When I was in my hooter hider making frenzy a few years ago I made a camo hooter hider out of this same fabric, so now I will have a matching set :)

Wednesday, May 16, 2012

A few years ago I made a bunch of flower hair clips for the girls.  Slowly they have been getting lost and broken, so I thought I might make some more and looked back at my notes and links. One that was missing was for Kanzashi Flowers.
I had found this book, Kanzashi in Bloom, at the Library where we had been living at the time.  It had several very cool patterns and directions for folding fabric into flowers and project ideas for applying the finished flowers to.  I mostly just made them and used them for hair clips though.  The book was well written and easy to follow. Just wanted to document it so I didn't have to search for it again.

Tuesday, May 15, 2012

I made my first neck tie onesie today:)  I think it is so cute, but there are a lot of puckers.  I obviously need to work on sewing with knits/stretchy fabric.

I a fusible webbing on the back of the tie, but I think if I make another one I need to use a double back fusible webbing so that I can iron it onto the shirts before I sew it into place and that might solve my problem.  If not, I might just sew it by hand instead of on the machine.

I used this tutorial and pattern found here, but I had to reduce the pattern to 70% it's original size to make it fit on to my tiny onesie.

I can't wait for this little guy to come, but something I've noticed it that there are not a lot of projects for boys.  Does anyone have any favorite baby boy projects?
-Bri

Sunday, April 22, 2012

Some of our Navy friends out here had a baby shower for Me and another spouse who is excepting a baby soon.  I knew it was coming, but thought that they were going to do a group gift since that is what has been done for us in the past.  But as the shower got closer I realized that I needed to come up with a gift on my own.  I didn't have a ton of time (1 1/2 days to be exact) but I wanted to do something that would be special.  So I went back to a pattern that I had made before and knew would work up quickly.
This is what I came up with

I loved it on paper, and in the store when I picked out the fabric, and when I wrapped it...  But when she opened it and right now looking at the picture, I think the pink looks strange, Most of the flowers have pink on them, but I think I should have used a pink trim instead of yellow.  Also, the back is a plain lavender and when I was done quilting it I thought it would have been nicer with a subtle print to the purple.

Since I was on a time crunch I quilted it by machine.  I outlined all the blocks and the borders.  Then I quilted a few inches inside of the flower wreath.  I didn't have enough time to tie some yellow ribbon or yarn in the center of each flower like I wanted to, but I'm still happy with it overall.  And it went together a lot faster than the first time I did this pattern.  Probably because I didn't go exclusively by the pattern, I made it my own with the material I had and then took it to the fabric store to find a backing and border fabric.  And that is what a scrappy quilt is meant to be I think.

Anyway.  The pattern is one of Eleanor Burns Free patterns on her Quilt in a Day website.  It is the Rainbow wreath pattern that can be downloaded there.

Saturday, April 14, 2012

1 step forward, 2 steps back

So I posted a while ago that I was excited about the tulips that I planted, they are still doing great. (Aside from the 2 that were eaten by animals and the 1 that was broken in half. I'm not sure if that was done by a child or animal...)I've been so excited about planting because after our long winter I am just SO tired of seeing the ugly bare branches everywhere. so with the success of my tulips I decided to buy some beautiful blue hydrangeas that were at the grocery store. I got 3 of them and kept them in the pots, but put them where I intended to plant them for a few days to see how they would do and they looked like this...
They seemed fine, so I went ahead and planted them. The next day I saw them and they were DEAD!!! Like this...
I was so frustrated and I just kept thinking about what a horrible gardener I am. I called my Mom who said that night there must have been a frost that killed the flowers and leaves, but that the roots should still be good, so I should leave them there and next year they might bloom again. LEAVE THE UGLY DEAD PLANTS IN THE SAME SPOT WHERE I SEE THEM EVERYDAY FOR A YEAR? Ug, talk about a daily reminder that I have a brown thumb.
I guess this is my 'I can't be good at everything' post.
Better luck next time

But on a brighter note, there are a few things in the yard that have been sprouting on their own. The Strawberry and blueberry bushes look good and the butterfly bush looks like it will be pretty again in the summer. But there are some things I can't identify, I call them my mystery plants. These I think will be flowers, but I have no idea what kind

And about a hundred of these have popped up all up and down the driveway. At first I thought they might be tulips, but now I am wondering if they are trees growing from all the acorns that came down in the fall. If they are trees I will have to go and pick all of them, but if they are not, I will be so excited to have flowers growing along the driveway.
What do you think my mystery plants are?

-Bri.

Friday, March 30, 2012

LT Promo Cookies

In December my husband advanced to the rank of Lieutenant in the Navy. My girls and I were so proud of him. In the Navy there is a tradition called a "wetting down" where the guy being promoted is supposed to throw a party and buy boos for everyone. However, we don't drink, so we thought we would just invite everyone over to our house for a alcohol-free party after the ceremony. But being December everyone was busy with the holiday rush and we just never could find a good weekend to do the party. Today we are finally doing the party. So I made these cookies for the kids.

It is a collar device. On Camouflage uniforms there are patches on each point of the color. One side has a patch that tells the rank, and the other patch tells what their job is/what they do in the military (builder, pilot, medic, JAG...)
It's been a while since I've made my fancy cookies. So it was fun to pull all my decorating stuff out and take a photo of the final product to add to my cookie sideshow :)
Since we are not paying for a bunch of wine and beer, my husband said he'd cater the dinner, so I don't have to worry about cooking for a ton of people. Instead of focusing on the food I've been busy all week getting the house clean and finally doing all the things I've been ignoring since we moved in like hanging pictures, curtains and moving furniture that just didn't seem to be in the right place. It feels good to look around the house and feel like we are more settled.

Tuesday, March 20, 2012

Spring is here!!!

I don't think I have EVER been the type of person to have a favorite season, until now. Our first New England winter might not have had a ton of snow fall, but the temperatures were sure cold for a long long time. But in the last week, we have had 3 days that made it to 70 degrees :) It's amazing to see not just plants come to life but people too. I seem SO much happier being able to go outside and not freeze and to be able to let my kids out to play again is such a blessing.
So to welcome the first day of Spring, my project today was to plant these cute tulip bulbs along our front walk. I thought the front walk was cute when all the snow melted away, but now I think it's even better :) I can't wait for the petals to pop out!

And here are my 2 best water girls. They helped so I saved 2 bulbs for them to plant near our swing so they can see them change each day while we wait for the bus.
I got the tulips at Walmart 3 to a pot and they were REALLY pot bound. I had to tear the poor things apart, so I hope the roots that survived will give them a good start. I've never felt like I had a green thumb, but I'd love if these turned out.

I hope that spring is quick to come for everyone.
-Bri

Wednesday, March 14, 2012

Porch Swing cover

For therapeutic reasons, I need to take this opportunity to complain about my landlord. Because he is the reason I had to do this project. (if you want to skip my gripes, don't read the next paragraph.)
He is a nice guy and we liked him when we moved in, but he never has anything positive to say about how we take care of his house and in my opinion we are rock star tenants. He frequently complains about the swing we have at the end of the driveway. We sit on it while waiting for the school bus everyday. For some reason he thought it was ugly and told us every time he came to the house along with his other lists of complaints. At first I tried to brush the issue under the rug and say, "ya, we should do something about that." But the last time he came he tried to tell me that it was so ugly that it was going to drop the property values of the "neighborhood" (We don't live in a development. We live on a rural highway, give me a break! Not to mention the fact that WE PAY YOU TO PUT OUR STUFF WHEREVER WE WANT IT TO BE!!!) I thought I would leave it there FOREVER just to spite him, but after our last snow fall the fabric in the rain cover got a huge hole in it. So I had to admit it was time to make a new cover for it. But the whole time I've been stewing about how much I hate that I have to do this and that he might think I am doing it for him. Sorry for the rant.

Anyway, I measured the swing to find out how much fabric I would need. according to my calculations I needed 3 1/2 yards, but I ordered 4 yards just in case. It's a good thing that I did, because I barely had enough fabric.
  1. I laid the existing cushion and rain cover on the fabric so I could use them as a template instead of calculating the dimensions to cut and then end up short someplace.
  2. After cutting the material for the seat cushion I turned it right sides together and sewed the raw edges together. Then I turned it right sides out. I sewed the edge that I just did into place with a top stitch. At both ends begin and stop your stitching about 2 inches from the edge so that there is room to fold over the edges when we get to that point.
  3. Then I sewed about 3 inches from that so that there would be a little flap hanging down from the bottom of the seat. (That's how the old one was) Leave the first and last 2 inches un sewn like before so they can be folded over when we are ready for that step.
  4. Next I put the cushion inside of the fabric to determine how many inches the flap on the other end can be.
  5. After you sew a flap on the other end, attach some ribbons to the top edge of the fabric. This is one of the features that holds the swing into place.
  6. Make sure to sew all the edge by stitching a box. Also, you are only stitching the middle part of the ribbon to the fabric. This will enable you to use both ends of the ribbon to tie.
  7. Put your old seat cushion into the new cover and smooth everything out. This is now the time to fold over the edges. Work with one edge at a time. Bring the cushion to the edge of the fabric and pull out any ties or Velcro out. Pin the seam with the raw edges folded to the inside.
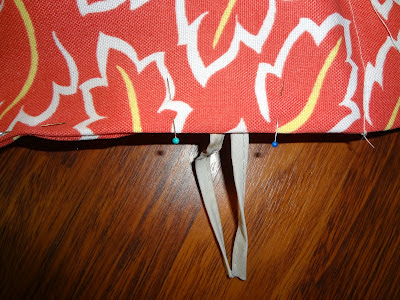
  8. You will be seeing the seams, but you don't want to sew over the ties, they will need to be shifted around a bit after sewing. So just place some pins on either side of the ties to help remind you to stop sewing at those places.

  9. You can see here that I left a gap in the stitching
  10. Pull on the straps so that the cushion gets squished all the way over to the edge.
  11. Repeat pinning and sewing on the other side.
  12. Smooth everything out and place pins down the center
  13. Sew a seem down the center. This it TOUGH to get all that fabric through your machine. I think it messed with my tension a bit too. So be careful.)
  14. Now sew up those holes around the seat's original ties.

Your cushion should look like this

Here is my finished product. I think it is FABULOUS!
I won't go into detail about how to make the rain cover, I'll just say that I examined the construction of the original rain cover and copied it as closely as possible.

I got the fabric online at www.fabric.com
It was outdoor fabric and was only $4 a yard! Plus I found a coupon code online so including shipping it was only $22, The velcro was $6. So I spent $28 on something that would have cost 3 times as much.