Friday, March 30, 2012

LT Promo Cookies

In December my husband advanced to the rank of Lieutenant in the Navy. My girls and I were so proud of him. In the Navy there is a tradition called a "wetting down" where the guy being promoted is supposed to throw a party and buy boos for everyone. However, we don't drink, so we thought we would just invite everyone over to our house for a alcohol-free party after the ceremony. But being December everyone was busy with the holiday rush and we just never could find a good weekend to do the party. Today we are finally doing the party. So I made these cookies for the kids.

It is a collar device. On Camouflage uniforms there are patches on each point of the color. One side has a patch that tells the rank, and the other patch tells what their job is/what they do in the military (builder, pilot, medic, JAG...)
It's been a while since I've made my fancy cookies. So it was fun to pull all my decorating stuff out and take a photo of the final product to add to my cookie sideshow :)
Since we are not paying for a bunch of wine and beer, my husband said he'd cater the dinner, so I don't have to worry about cooking for a ton of people. Instead of focusing on the food I've been busy all week getting the house clean and finally doing all the things I've been ignoring since we moved in like hanging pictures, curtains and moving furniture that just didn't seem to be in the right place. It feels good to look around the house and feel like we are more settled.

Tuesday, March 20, 2012

Spring is here!!!

I don't think I have EVER been the type of person to have a favorite season, until now. Our first New England winter might not have had a ton of snow fall, but the temperatures were sure cold for a long long time. But in the last week, we have had 3 days that made it to 70 degrees :) It's amazing to see not just plants come to life but people too. I seem SO much happier being able to go outside and not freeze and to be able to let my kids out to play again is such a blessing.
So to welcome the first day of Spring, my project today was to plant these cute tulip bulbs along our front walk. I thought the front walk was cute when all the snow melted away, but now I think it's even better :) I can't wait for the petals to pop out!

And here are my 2 best water girls. They helped so I saved 2 bulbs for them to plant near our swing so they can see them change each day while we wait for the bus.
I got the tulips at Walmart 3 to a pot and they were REALLY pot bound. I had to tear the poor things apart, so I hope the roots that survived will give them a good start. I've never felt like I had a green thumb, but I'd love if these turned out.

I hope that spring is quick to come for everyone.
-Bri

Wednesday, March 14, 2012

Porch Swing cover

For therapeutic reasons, I need to take this opportunity to complain about my landlord. Because he is the reason I had to do this project. (if you want to skip my gripes, don't read the next paragraph.)
He is a nice guy and we liked him when we moved in, but he never has anything positive to say about how we take care of his house and in my opinion we are rock star tenants. He frequently complains about the swing we have at the end of the driveway. We sit on it while waiting for the school bus everyday. For some reason he thought it was ugly and told us every time he came to the house along with his other lists of complaints. At first I tried to brush the issue under the rug and say, "ya, we should do something about that." But the last time he came he tried to tell me that it was so ugly that it was going to drop the property values of the "neighborhood" (We don't live in a development. We live on a rural highway, give me a break! Not to mention the fact that WE PAY YOU TO PUT OUR STUFF WHEREVER WE WANT IT TO BE!!!) I thought I would leave it there FOREVER just to spite him, but after our last snow fall the fabric in the rain cover got a huge hole in it. So I had to admit it was time to make a new cover for it. But the whole time I've been stewing about how much I hate that I have to do this and that he might think I am doing it for him. Sorry for the rant.

Anyway, I measured the swing to find out how much fabric I would need. according to my calculations I needed 3 1/2 yards, but I ordered 4 yards just in case. It's a good thing that I did, because I barely had enough fabric.
  1. I laid the existing cushion and rain cover on the fabric so I could use them as a template instead of calculating the dimensions to cut and then end up short someplace.
  2. After cutting the material for the seat cushion I turned it right sides together and sewed the raw edges together. Then I turned it right sides out. I sewed the edge that I just did into place with a top stitch. At both ends begin and stop your stitching about 2 inches from the edge so that there is room to fold over the edges when we get to that point.
  3. Then I sewed about 3 inches from that so that there would be a little flap hanging down from the bottom of the seat. (That's how the old one was) Leave the first and last 2 inches un sewn like before so they can be folded over when we are ready for that step.
  4. Next I put the cushion inside of the fabric to determine how many inches the flap on the other end can be.
  5. After you sew a flap on the other end, attach some ribbons to the top edge of the fabric. This is one of the features that holds the swing into place.
  6. Make sure to sew all the edge by stitching a box. Also, you are only stitching the middle part of the ribbon to the fabric. This will enable you to use both ends of the ribbon to tie.
  7. Put your old seat cushion into the new cover and smooth everything out. This is now the time to fold over the edges. Work with one edge at a time. Bring the cushion to the edge of the fabric and pull out any ties or Velcro out. Pin the seam with the raw edges folded to the inside.
  8. You will be seeing the seams, but you don't want to sew over the ties, they will need to be shifted around a bit after sewing. So just place some pins on either side of the ties to help remind you to stop sewing at those places.

  9. You can see here that I left a gap in the stitching
  10. Pull on the straps so that the cushion gets squished all the way over to the edge.
  11. Repeat pinning and sewing on the other side.
  12. Smooth everything out and place pins down the center
  13. Sew a seem down the center. This it TOUGH to get all that fabric through your machine. I think it messed with my tension a bit too. So be careful.)
  14. Now sew up those holes around the seat's original ties.

Your cushion should look like this

Here is my finished product. I think it is FABULOUS!
I won't go into detail about how to make the rain cover, I'll just say that I examined the construction of the original rain cover and copied it as closely as possible.

I got the fabric online at www.fabric.com
It was outdoor fabric and was only $4 a yard! Plus I found a coupon code online so including shipping it was only $22, The velcro was $6. So I spent $28 on something that would have cost 3 times as much.

Saturday, March 3, 2012

Mary Engelbreit Quilt

Okay, I've been working on this thing for a YEAR!!! My Sister got the embroidery kit for me for my birthday so I could work on it while my husband was deployed. (Thanks Siri!)

I finished the blocks in December and wanted to give it to my daughter for Christmas, but turning it into a duvet cover proved to be trickier than I thought. So I left it alone for about 2 months so I could put my frustrations on the shelf and after a week or 2 of working on it again I finished it :)

I'm excited because this is the biggest quilt I've ever done all on my own.
If you like the quilt and want to make one, HERE is a link it the kit on amazon

Some things I learned/want to remember about this project:
  • The blocks took a long time to do because there were several shades of each color.
  • I don't know the name of the way I put the blocks together with the purple squares and yellow rectangles, but I think this is my favorite way to put a quilt together.
  • I did a piano key boarder, it was my first time and I LOVE the bold look of it, but it was difficult to calculate how much fabric it would take. Also trying to match up the corners was too tricky and I ended up covering the seam with some black bias tape for trim. I'm happy with that compromise.
  • I used a very nice old flannel top sheet for the backing and outside boarder. (We rarely use our top sheets so it still looked like new and the fitted sheet that went with it had some holes worn in it and so we had thrown it out. So I figured what the heck, why not use it?) I think this can be a great idea for making large quilts. You can find brand new nice sheets online that have a high thread count. (I saw some 500 thread count twin sheets on clearance at Macy's for only $11 last week! you couldn't get that much yardage in a fabric store for that price.)
  • After using a straight stitch to piece it together, I used a zig zag stitch/blanket stitch on the edges of my seems so that they wouldn't unravel and survive washings in the laundry. I did this because it is a duvet cover and not a quilt.
  • I tried and tried to make all the seems be on the inside of the duvet cover, so when I turned it around it was a perfectly clean pocket with an edge folded over the opening, but that was the part that proved to be too tricky for me. So eventually I got tired of using my seam ripper and I just folded down the edge and sewed it on the top. You can see that seam, but it is on the bottom where it will be tucked under the mattress anyway.
  • Another problem I had was that I wanted the cute lacy edge of the sheet and the buttons to be on the top edge, but When I stepped back I realized I put it at the bottom. I was disappointed, but I think it still looks fine and I wasn't interested in undoing all the seams needed to fix it.
  • I'm also just now realizing that I wanted 2 of my blocks to be in another place. Oh well, I guess those can be my Amish humility blocks.
Here she is in front of it.
Yes there is a story to the costume. She had been doing dance classes for the past 6 months and started to not like them. We decided to do something new but then her teacher showed her the costume they would wear for their spring recital and she hated the idea of not being able to wear it. So my husband and I told her that if she stopped dance like she had wanted to, we would still get her whatever fancy costume she wanted. We shopped online and told her the sky's the limit. (We figured anything would be cheaper than another session of dance fees.) instead of choosing a sparkly pink ballet costume like we thought she would go for, she picked this Native American costume. She is super excited about it and I think we could even convince her to wear it for Halloween if we played our cards right.


Thursday, March 1, 2012

XL overcoat to Maternity coat

I thought about doing a video tutorial for this one, but realized anyone who might try this will be starting with a different product, so it would be easier for me to just type out a general idea of how I did mine to give people an idea of how to do theirs.
I live in the North East and we have COLD winters. So I needed a maternity coat I could wear once my tummy got too big for my regular coat. But I HATE the idea of buying an expensive maternity coat for just a few months. Instead I made one, I went to the thrift store and bought a coat that was too big, but that had potential It was $7. Here I am modeling it in my night gown. Classy right!
BEFORE
AFTER

The coat is fake fur and suede, so there was no lining fabric to deal with. That was one of the things I liked the most about it. It also had these seem lines in the back.

So I turned the coat inside out and marked it with Chalk. I made 2 lines, one at the base of the arm pit and the other a few inches bellow that. (At the time I wasn't sure how far down I wanted to sew, but ended up choosing the top line.)
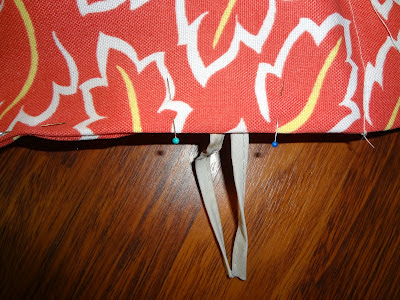
I pinched the fabric between each seem line in the back and pined them together.
Then I used my sewing machine and sewed from the neckline down to my chalk lines.using the previous seam lines as a guide for my sewing machine foot.

After that I took some ribbon and made a belt out of it. I used grosgrain ribbon because I thought the texture would help it to stay tied well. I folded it in half to find the center and sewed that into the center seam in the back of the jacket so I wouldn't loose the belt. Then I made some belt loops out of some of the extra ribbon and sewed those just a few inches under the armpits.
The jacket was a little tight with all the extra fabric in the back so I cut the extra fabric out. I made a seam allowance of about 1/2 or 3/4 an inch. and stopped cutting about an inch above the bottom of my seam.
I think it turned out cute and I'm not embarrassed to wear it anymore. In fact with the fur cuffs and collar it makes me feel a little bit like a Diva :) I wonder if it will still be cute on me when I'm not pregnant next winter.