Monday, March 22, 2010

Hair Bow/Flower Crazy:
To survive life while Sam is so busy with work I have been making a TON of hair accessories for Girls. It's been fun to have something to do. I added a bunch of links on the sidebar for flowers and other hair things. Posted here are the ones I'm excited to try/ have tried

Low profile bow-

https://www.theribbonretreat.com/custom/modules/FreeProjects/PDFMiniClippieInstructions.pdf

several different types of bows-

http://www.hipgirlclips.com/store/index.php?main_page=index&cPath=31_135

Big Ribbon Flower-

http://www.theribbonretreat.com/custom/modules/FreeProjects/PDFFlowerLoopBow.pdf

Felted Yo yo flower, 1 layer big ribbon flower, butterfly, 2 layer big ribbon flower, 1 layer ribbon flower.

Bug clips-

http://www.theribbonretreat.com/custom/modules/FreeProjects/PDFLittleBugBows.pdf

Korker Ribbon-

https://www.theribbonretreat.com/custom/modules/FreeProjects/PDFHowtoMakeKorkerRibbonandBows.pdf

silk flower clips-

http://homemadebyjill.blogspot.com/2009/06/flower-headband-tutorial.html

(This one shows putting the flower directly on the headband, but I just sewed the pedals to themselves and used a little hot glue on the bottom of the first pedal to make sure the thread didn't tear through the flower. When I was done I glued it to a clip)

Hair clip holder:

I found a wooden decal at walmart, taped in a "hair Clip" label I printed out on the computer and hot glued a ribbon to dangle down from the wood. Loop a small ribbon and hot glue it on top so you can hook it onto something. Then just clip all your hair things into the long ribbon.

Sunday, March 21, 2010

ranch potaoes

Mmmm,
We all loved this recipe, It's only down fall is that you use a ranch dressing mix packet for it. But it was SO good.
http://hiddenvalley.com/recipe/view/113/
I hope we can find a way to make something similar without having to use packaged foods.

Saturday, March 20, 2010

Cinamon sugar muffins

Double success!!

This week I tried 2 new things and am SO proud of myself :)
I've never been too good with Muffins. I normally feel like the sides are over cooked or I pull them out too early and they are undercooked. After trying this recipe I'd decided that perhaps my previous problems had more to do with my old recipe than to do with my cooking abilities ;)

French Breakfast puffs-
http://allrecipes.com/Recipe/French-Breakfast-Puffs-2/Detail.aspx

The kids LOVED these. The batch made 12 muffins and I had to snatch one away to save for Sam. Before Sam woke up Gwen asked me to make another batch. I look forward to playing with the recipe and adding things to them/ coming up with different toppings.

My other success was in knitting. I've been trying to knit/crochet for the last 10 years and have never really felt like I had much success. every once in a while I would try a new project and either not finish it, or decide that it had enough mistakes when it was finished that I was not willing to give it away to anyone or use it myself.

But this week I saw a bunch of knitting projects that my friend Aimee made and they were so cute I decided to give knitting another try. I got a pattern from some of the links she posted and about 3 days latter I had this hat.

http://algerianaction.wordpress.com/my-free-patterns/

it is the "Supper Simple Baby Hat"

I did make a few mistakes, but not major ones, and when the hat was done I was excited to try a new pattern with some new stitches to learn. Thank you Aimee for the lessons/girls night outs that we did so I could watch/learn from you. I really thought knitting and crocheting was just not my thing. But apparently practice does make perfect. Or at least near perfect :)

Thursday, March 18, 2010

The last time I was home visiting my family my Mom let me take this pattern home. It is one that she said she used a lot, so I was excited to try it. Since Sam has been SUPPER busy at work I made this to pass the time away last week.


I used a blue fabric that felt a lot like a men's dress shirt. It has a very small white vertical stripe in it. I think it looks like the perfect Easter/Navy send off dress.
The dress was easy to make. I did make a small alteration by adding sleeves. I wanted them to have some ruffles on them like the waist and shoulders of the dress.
  1. I cut out a long strip of fabric, sewed in some long basting stitches on the top and bottom of the strip, then sewed the ends together.
  2. I matched the seem in the sleeve with the side seem of the dress and sewed the bottom half of the sleeve to the arm hole in the dress.
  3. I pulled my basting stitches to ruffle the top of the sleeve to fit into the dress and pinned it in place, and finished sewing the arm hole.
  4. Then I measured my arm to see how large the bottom of the sleeve needed to be. I pulled the basting stitch and arranged the ruffles until it was the right size and the ruffles looked even.
  5. I cut a long skinny strip of fabric to finish off the bottom of the sleeve. Cut it and fold it to be the size of a bias strip. (If you want to follow the lines in the fabric that will be okay, it does not actually need to be on the bias.) Make it the length of the bottom of the sleeve plus a seem allowance. Sew the ends together, then use it to finish off the sleeve like you would normally sew in a bias strip.

I liked it A LOT, but I think I made the opening of the sleeve a little too big and I might try to go back and shrink that up a bit. Especially because it the rest of the dress is a little snug on my now, so when the the dress fits me better, the sleeves will look supper big.

If I ever feel like I need another formal, I might try to make my own and use this pattern if I can find a good way to make a formal sleeve to match the rest of the pattern.

Sunday, March 7, 2010

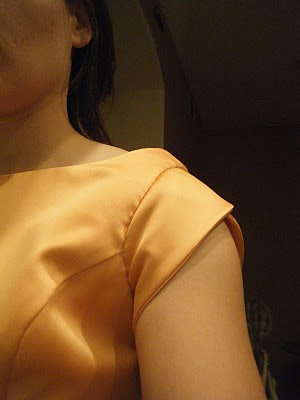
Finally I had some time to do another fun project. Sam and I went to the CB Ball last night so for the past 2 weeks I have been working on my dress in my spare time. I got the dress at a thrift store in October and made some sleeves and a panel for the back out of the shall it came with.


To make the sleeves I took a pattern that I already had and altered it to be a petal sleeve. I found the directions for making a normal sleeve pattern into a petal sleeve pattern. It was fairly easy since you overlap the fabric to fit. So the pattern piece does not have to be a perfect match for the existing sleeve.
I double sided the sleeve so that I could just sew the front and back to one another instead of having to hem the edge. It was SO much easier to just turn it around and iron it flat.

For the back panel I put the dress and put pins in the sides where I wanted the panel to reach. I Roughly measured how large the piece of fabric would need to be and cut some pieces that were larger than my measurements. I wanted a seem to be through the middle of the panel so that it could mirror the train on the dress bellow the bow. I hand sewed the panel in so that the stitching was not visible. Like the sleeves, I also sewed 2 pieces of fabric together so that I did not have to do any hemming, just turn and press.

Saturday, March 6, 2010

My hair for the CB ball was SO easy. I have spent the last week watching video after video on you tube for how-to's on easy updo's and found this one. It's called The Holly

http://www.youtube.com/watch?v=U23DXFYt7G0

I did it a little differently because my hair is a little bit shorter and thinner than the woman in the video. I began with oily hair, then I put some palm-aid around the hairline to help control the friz. Instead of pulling my hair 1/2 way through the last time I wrapped the pony tail holder I pulled it all the way through. Then I back combed my hair a little on the underside. I rolled the hair under itself as if I was wrapping it around a roller. I took one of Gwen's bobble hair elastics (the ones with a ball on each end) I strung one side of it through the hole made by the hair and wrapped the other side around the base of the existing ponytail holder. Finally, I took a hair comb, caught a little bit of hair in it and then pushed it in right in front of the ponytail. I loved it. But most of all, I loved that it was easy.
It did take me a few times to get the technique down just right. So I'd say if you are going to wear this for your next formal event, practice a few times the day before.