Friday, December 18, 2009

Grocery list
Since you try to deplete your perishable food as much as possible before you move, there are a lot of items you will need to get on your first grocery shopping trip after the move. The price tag will probably be high, but remember, these are all items that you didn't replace those last few months before your move, so you were saving money every week at the grocery store by not replacing them.
Here is a list of the grocery items I normally have in my house. Before your first shopping trip, go through and check off any items that you were able to move with you. Then you can take the list with you to the grocery store to get your home fully stocked.

Fridge
  • Skim Milk
  • Whole Milk
  • Juice
  • Yogurt
  • ketchup
  • Mustard
  • Mayo
  • Parmesan Cheese
  • Soy Sauce
  • Worcestershire Sauce
  • Salsa
  • Ranch dressing
  • Strawberry Jam
  • Lemon Juice
  • Chocolate Syrup
  • Butter
  • Cottage Cheese
  • Sour Cream
  • Cheddar Cheese
  • Lunch Meat
  • Eggs
  • Fruit
  • Veggie
  • Minced Garlic
  • Yeast

Freezer

  • Peas
  • Corn
  • Hamburger meat
  • Chicken breast
  • Juice

Pantry

  • Bread
  • Vanilla Extract
  • Maple Syrup
  • Flour
  • Sugar
  • Powder Sugar
  • Brown Sugar
  • Rice
  • Salt
  • Shortening
  • Peanut Butter
  • Baking Powder
  • Baking Soda
  • Spaghetti Noodles
  • Fettuccine Noodles
  • Oatmeal
  • Vinegar
  • Cocoa Powder
  • Cooking Oil
  • Saltine Crackers
  • Goldfish Crackers
  • Mac'n'cheese
  • Pudding
  • Spaghetti Sauce
  • Bean w/ Bacon Soup
  • Vegetable Beef Soup
  • Pork and Beans
  • Refried Beans
  • Green Beans
  • Canned Peaches
  • Mandarin Oranges
  • Cream'o'Chicken Soup
  • Cream'o'Mushroom Soup
  • Tortillas

Spices

  • Cinnamon
  • Chili Powder
  • Dehydrated Onions
  • Ginger
  • Chicken Bouillon
  • Beef Bouillon
  • Cumin
  • Nutmeg
  • Thyme
  • All Spice
  • Sage
  • Basil
  • Cream of Tartar
  • Oregano
  • Rosemary
  • Tarragon
  • Cloves
  • Poppy seeds
  • Paprika
  • Almond Extract
  • Ground Pepper
  • Seasoning Salt

Disposables

  • Toilet Paper
  • Paper Towels
  • Tissues
  • Q-tips
  • Garbage can liners

toiletries

  • Bri's shampoo
  • Sam's Shampoo
  • Gwen's Shampoo
  • Bri's soap
  • Sam's Soap
  • The Girls soap
  • Contact solution
  • Toothpaste
  • Floss
  • Shaving cream
  • Sam's Deodorant
  • Bri's Deodorant
  • Lotion
  • Bandaids
  • Neosporine
  • Razors

Cleaners

  • Dry Sheets
  • Spray-n-wash
  • Laundry Detergent
  • Fabric Softener
  • Dish Detergent
  • Dish Soap
  • Bleach
  • Glass Cleaner
  • All purpose cleaner
  • Ajax
  • Mop
  • Mop Bucket
  • Broom
  • Dust Pan
  • Scrub brushed
  • SOS pads
  • Dish Scrubber
  • Hand Soap
Field Kit
A field kit is a box, or several boxes, of things that you will need or want during your transition from house to house. (The majority of the items in this list were taken from a military web site called "smart web move")
  • snacks
  • bottled water
  • grocery bags
  • Small first aid kit
  • sunscreen
  • Perceptions and other meds you might want like aspirin or midol
  • Battery operated clock/alarm
  • Extra pair of glasses/contacts
  • Small tool kit
  • Toilet paper
  • Paper plate, cups and plastic cutlery
  • Flashlight with batteries
  • Light bulbs
  • Soap/hand sanitizer
  • address book
  • keys
  • Accordion folder with all your important documents in it.
  • Paper pens, stamps, envelopes
  • packing tape/duct tape, cellophane
  • scissors
  • tape measure.
  • an air mattress and bedding

Baby specific items

  • Diapers
  • Formula
  • Special toys/blanket
  • Wipes
  • port-a-crib and bedding

Other Items you will want to pack in some suitcases to take with you and not the movers

  • a weeks worth of clothing
  • basic toiletries
  • books or magazines
  • portable DVD player and some of your favorite DVD's
  • Lap top
How to get settled into a new home

Like the moving timeline, this is a work in progress, I'm going to put down my plan, change it as needed, and hopefully life will be easier the next time we move.

A month or so before your move you should go to the area, meet the people at church and make some choices about if you want to live on base or not.

Once you have your moving dates set, call a friend at the new base or someone you met at church and ask them to watch the kids for you while the movers are unloading the moving truck.

If moving into on base housing from on base housing at your previous station, you must be out of your old house before you can get on the waiting list for a new house. Even if there is no one on the waiting list, it will take the housing office 2 days to process the paper work so you will be homeless and living out of a hotel for at least 2 days. Make sure you have your Field kit.

On the move in day
  • Do a walk through of the house with the housing office and sign all the paperwork (This might get done the day before the movers come.)
  • Take the girls to the sitters
  • Before the movers come, make sure to put soap/hand sanitizer and toilet paper in the bathrooms.
  • Movers arrive
  • Order pizza and soda for the movers as a tip
  • Pick up the girls from the sitter after the movers go home.
  • If the movers didn't assemble the beds, assemble temporary beds to sleep on for the night. If the movers did set up the beds, get bedding out of Field kit.
  • After the kids are asleep the first thing for me to do is set up the Kitchen
  • then finish the bathrooms if you are not too tired.

The day after move in

  • Set up the kids bedrooms and make sure their toys are accessible.
  • Set up our bedroom so Sam can get ready for Work in the mornings.

The 3rd day

  • Set up the living room
  • hook up the electronics
  • Go grocery shopping

the 4th day

  • Take care of the remaining items as needed.
How to move timeline:
I think that this time I am going to take things to the next level and write down everything I should do in a timeline, so I can make use of it next time. I will write down my plan now, and add/take away things as I go. Let me know if i seem to be missing anything.

2-3 months before

  • organize everything!!! Make sure that there is a place for all your stuff so when small items accumulate in your favorite junk piles, it will be easy to put them away when you have time to clean up
  • Do a thorough cleaning of the house, this will make cleaning upon move out much faster and easier. Keep the house tidy for the next few months so you don't get overwhelmed as the move approaches
  • Simplify. if there are things in your house that are taking up space but are not needed/being used put them away in the garage. It will have to keep the house clean. This could include:

-taking a load to the dump

-taking a load of stuff to charity

-pack up extra toys and books that are not needed before the move.

  • Don't throw out stuff that you know you will just accumulate again after you move. It is not productive, especially if professional movers are doing the job.
  • Begin trying to use up the perishable foods in your house. This can be done easily if you look at what you have and plan your weekly dinner menus around it instead of buying the "usual stuff" at the grocery store each week. (The movers will take food in cans, so don't worry to much about getting rid of those.)
  • Find out about the requirements for giving notice to the housing office, schools, gyms and other businesses you might need to inform of your move. (Most often they require 1 months notice, but giving early notice doesn't hurt.)

1 month before the move

  • Schedule the housing pre-inspection if you are on base. Make sure to have the house looking perfect when they come. It will make it more likely that they will go easy on you during the final inspection
  • Schedule the Movers pre-inspection. They will want to know how much stuff you have, remind you about what you need to do and answer any of your questions.
  • Begin pulling out items that the movers will not move. For example, under the sinks, divide the area into 2 boxes. label 1 "Movers take" and the other "We take" The one for us to take should have any flammable items/liquids.

2 weeks before

  • Dust fan blades and vents. Sweep the walls and ceilings to remove cobwebs and dust.
  • Pick up all items that are on the outside of the house like toys, lawn furniture, mats, or BBQ's and put them in one place so the movers don't have to search the yard for all of your stuff. The toys can even be put away in the garage so the kids don't play with them and leave them all over the yard.
  • Wipe down any areas of the walls that are supper dirty. (The housing office will paint the walls, so we don't need to worry too much about this as long as the big stuff is cleaned up.)
  • Pack a "Field Kit" This is a box of stuff that you will want to be with you instead of the movers. And stuff to use before you get everything unpacked at your new house.

1 week before

  • take down any items in your home that need to be washed before packed. Like, drapes, shower curtains, bath mats, area rugs... After washing them, fold them and put them someplace the kids won't get to so they are clean when you get to your new home.
  • Take down any items that are attached to the walls like lighting fixtures or shelf you would like to take with you, closet organizers... Items that are simply hung on the walls with a nail can be left on the walls and the movers will pack them. However, if you would like to take the hook or screw that it in the wall and needed for hanging the picture, you will need to take it because the movers would just leave it in the wall.
  • Wash down the outside of the house with a hose. Just spray it to get the cobwebs off and any dirt washed away.
  • Wash all windows and doors
  • clean out and block off all bathrooms but 1.
  • Call all companies that you have accounts with and inform them of your move/disconnect service.
  • Drain gas out of the lawn mower. If it leaks oil, drain the oil also.
  • Set up a place for the kids to stay while the movers are here.
  • Find people to come help clean after the movers are gone.
  • Clean out the oven and stove top and start eating out or use the microwave.
  • Make sure all the dishes are clean, put away and don't use them again

The day before the move

  • Strip the beds and wash everything
  • When laundry is all done, disconnect the washer and dryer from the wall
  • Disconnect all electronics
  • Take any Original packing boxes next to the items they go with for the movers
  • Take all perishable food items, luggage, cleaning supplies and any other items the movers wont move/you don't want the movers to move to your hotel room or your new home.
  • Pack suitcases of clothes and other items you will want for the next week.

The first moving day

  • Take the kids to the sitters at 7:30
  • Allied movers will probably come at about 8am, take lunch from 11:30-12:30 and go home at 4:30. If another moving company comes they will not leave for lunch and won't go home until it gets done. Word on the street is that it is common courtesy to order them pizza and have cans of soda for them. (Sort of like a tip.)
  • After the movers go home pick the kids up from the sitters and take them to the hotel.
  • After the kids are asleep have a cleaning party/Girls night out to say good bye to friends. Clean:

-The Fridge, inside and outside

-Wipe the inside and outside of the cupboards

- wipe the shelves in the closets

  • Ask the people that come to help to bring a bucket, a rag and a game.

The second moving day

  • Take the kids to the sitters
  • After the movers go, sweep and vacuum the floors.
  • Shampoo carpets
  • Mop up the hard flooring
  • clean anything else that looks like it was missed.
  • Pick up the kids

The following day check out of housing and go to the new house.

Friday, November 27, 2009

Divinity:

Ingredients:
3 cups sugar
3/4 cup water
3/4 cup corn syrup
1/4 tsp salt
3 egg whites
Wax paper

Directions:
  1. Mix sugar with water, corn syrup and salt.
  2. Boil to 258 degrees, when the temperature reaches about 245 you can begin to whip your eggs alone in the mixer. They need to reach the stiff peak stage.
  3. when the pot reaches 258 degrees, remove from heat and pour VERY SLOWLY over eggs. You want to have a very thin stream pouring into the eggs while they are still being stirred.
  4. Keep mixing until the divinity looses it's shine. At first the divinity will be very runny, continue mixing until it can hold it's shape when spooned out instead of spilling off the spoon. This takes between 10-20 minutes.
  5. If it doesn't set up, don't loose hope. you can keep mixing longer, or add 1/4 of a cup of powdered sugar at a time. (The powdered sugar will change the texture of the final product, so add slowly.)


This was my candy platter that I took to Thanksgiving. It had my caramels, the divinity, a fudge recipe out of Betty crocker, turtles (mini pretzels with a bit of caramel on top and crushed pecans sprinkled on top. Then all dipped in chocolate. These can be made with mini pretzels and milk duds put in the oven also.), chocolate covered pretzels rolled in crushed candy canes and chocolate covered pretzels rolled in crushed pecans.
Note to self:
  • Don't use the biggest Pot to make candy. All my batches that I made in there didn't turn out. I don't think that the candy is so spread out that it is not deep enough to give the candy thermometer a good reading. Use the medium stock pan. The candy boils over sometimes, but it temperature readings are good.
  • I need to have my glasses close by because it can be hard to read the thermometer without them at a safe distance.
  • After a few days of having the candy around the house get rid of it before you finnish it off :)

Tuesday, November 17, 2009

Deceptively Delicious book review

Cauliflower potatoes:

I recently tried a recipe from Jessica Seinfeld's Deceptively Delicious cook book. It's a great book that is really helpful with finding ways to hide veggies in your food. It has some great reference material for parents. Mostly, I liked that it got me thinking about adding veggies to recipes that don't don't call for them.


Since the recipe I used is published in her book, I won't share the exact recipe with you, but next time you make some mashed potatoes, add 1 cup of pureed cauliflower. We couldn't taste it in our dinner last night and I was glad to be giving the girls nutrition from veggies they wouldn't normally eat.
*************Update*************
It's been a year or two since this post, but I am still using the cook book. A friend reminded me how wonderful it was so I pulled it out and tried a few more recipes.
-The Couscous recipe with Butternut Squash and Carrot Puree was delicious. I loved it, Maggie loved it and our dinner guest loved it. We will make it again.
-The Deviled eggs with Carrot Puree was not something I will make again. But the recipe also suggested using cauliflower instead of carrots, so I might try that one.

Home made Yogurt

I finally joined in on the Homemade yogurt craze that has hit Ridgecrest. (It seems like everyone out here is making their own yogurt.) My first attempt failed miserably and so for my second I had 2 of my friends write out their recipes and tell me all about how they do it. Once I was equipped with 2 recipes and lots of advise I began my second attempts and it turned out great. We go through lots of yogurt because it is one of the few things that Gwen likes to eat, so this is going to save us some money.
Here's the recipe it is an overnight sort of thing, It's not a lot of work, it just has to sit for a while. So it is best to start in the afternoon or early morning.

Ingredients:
8 cups milk (equal to a half gallon)
8 oz of yogurt (equal to 1 cup)
1/2 cup dry milk
3/4 cup sugar
1 tsp vanilla

Directions:
  1. cook 8 cups of milk on low in your slow cooker for 2 1/2 hours. (3:30pm-6:00pm)
  2. after cooking for 2 1/2 hours, turn off the slow cooker and leave the yogurt alone for 3 hours. (6:00pm-9:00pm)
  3. Mix in the 8 oz. yogurt and dry milk.
  4. wrap the entire slow cooker in 1 or 2 large bath towels and leave it alone for 8-12 hours. (9:00pm-5 am/9am)
  5. after the 8-12 hour period, mix in the sugar and vanilla or other desired flavoring.
  6. Put yogurt in storage containers with lids and refrigerate. (Gwen likes to freeze the yogurt in Popsicle containers and it comes out just fine, but I'm sure I should look into a frozen yogurt recipe.)
Next time:
  • I think I will go to the grocery store and buy some cheep fruit, puree it, and add it to the yogurt in step #5. (I don't like chunks in my yogurt.)

Wednesday, November 11, 2009

Caramels:
Memories-Every Autumn I can remember having one Family home evening where we made Caramel and all sat around the kitchen table dipping apple chunks into the pot of hot caramel. The anticipation was always unbearable, we were always a big sticky mess by the end of the night, our tummies hurt and the left overs never stuck around for long.

My Mom would cut the apples into bite sized pieces and put them all in a big bowl next to the caramel pot. We would each get a small plate and a fork. We stab the apples with our fork, dip in it and laugh every time the caramel would slip off the apple bite.

Each year while we cooked it my Mom would tell us stories about when she was a teenager and worked in a candy shop. She had to cut the fudge and other candies to be perfect squares and always ate the pieces that didn't measure up. She'd also tell us about her grandmother who made fudge and would store it in the freezer in the basement. Great Grandma Dradge used to say that the fudge would come alive and call to her and by the time she needed it, it was always gone. And no Bryant Family Christmas party was complete without the exchange of homemade candies. The regulars were caramel, divinity and fudge. And the conversation always consisted of the Bryant Men discussing how many batches they had to make before their candy turned out, or what changes they made to the recipe that year. :) Hmmm, I wonder where I get my junk food eating habits?

It's been a while since I've been able to make caramel for fall. So My friend Aimee and I made some and chowed down. It was SO yummy and I thought I should post the recipe.

Caramel Recipe:
Ingredients-
1/2 cup butter
2 cups 1/2 and 1/2
3/4 cup light corn syrup
2 cups sugar

Directions-

  1. Mix only 1 cup of the 1/2 and 1/2 with the rest of the ingredients in a large pot on the stove. Siring consistently, heat until the mixture boils.
  2. Once the mixture reaches boiling add the remaining cup of 1/2 and 1/2.
  3. Siring frequently, cook over medium heat with a candy thermometer in it. It will look like the picture here for a long time
  4. Once it reaches 245 degrees remove the pot from the heat and continue stirring until the mixture stops bubbling. The mixture will be golden, but it probably won't look right until it stops bubbling so don't be worried about that. DON'T OVER COOK!!! it can quickly climb a few extra degrees, so when the temperature looks close to being done, don't leave it alone! (It can take a long time to reach 245 degrees and you don't want to end up with burned caramel because you weren't paying enough attention at the end.)
  5. 245 degrees is VERY HOT! Allow it to cool for about 5 minutes, then you can dip apples in it. I think the easiest way to eat caramel apples is to cut some tart apples into slices and put a few spoonfuls into a small bowl to spoon out of.
  6. When the caramel is no longer warm, it is very thick and difficult to manipulate. When you are done eating it with apples, pour the remaining caramel into a buttered pan. The next morning cut the caramels into small bite sized pieces and wrap them in wax paper.


Saturday, October 24, 2009

Make your own headband:


I was watching the neighbor girls yesterday afternoon and we worked on a project to pass the time away. I can't find my camera right now so I pulled a picture form Google images to show what the headbands look like. This one is a bit bigger than the one we made, but ours were still fairly chunky. We used some silky ivory fabric I had.
Here are the directions:
  1. Wash and dry the fabric
  2. Cut the fabric to be 4" by 42"
  3. use the template below and lay it on the "wrong" side of the fabric. On each end trace the pattern, it will make a 30 degree angles point.
  4. Take the fabric to the sewing machine and fold it in half with the "wrong" side out. Starting from the middle, sew the headband out to the points. back stitch when you begin, but do not back stictch at the point. (This will cause puckering.) Simply leave a long string of top and bobbin thread and double knot it. Do this to both sides leaving space in between to pull the fabric through.
  5. Cut off the extra fabric by the points and pull the fabric through the hole making the "right" side of the fabric show. Use something pointy like a crochet hook or a pencil to make the points look good. Then iron everything in place.
  6. Go back to the machine and sew from point to point. To avoid any puckering issues, you can begin and end about an inch from the point. Now you are done.

Note to self:

  • The girls were excited to use the sewing machine but were so tired form a long day at school that they had a hard time focusing. Especially once Maggie woke up form her nap. They just wanted to play with her.
  • They were here for about an hour and it was long enough to let them all get to the ironing stage, but we didn't have enough time for them to sew the hole closed.
  • They all needed complete supervision on every part of the task except for pulling the fabric through.

Friday, October 16, 2009

Navy Ball Hair:
Here are some pictures and directions for how I did my hair for the navy ball.
These are the special tools I used The green container is some very sticky goo I use to smooth things out, and control fly aways.


  1. make a part. I prefer for it to be off to the side. I take the part from my hair line to about 2 inches in at an angle. I think this makes a good chunky bang.
  2. I keep the bangs out of the way while I put the rest of my hair into a fairly high ponytail.
  3. Smooth the bangs back. I use flip clips to keep them in place and then remove them latter when it is closer to the time of the event. I normally put one clip in above my ear because that is where I am turning the direction of the hair. Then sometimes I put one more wherever it is needed to help keep a smooth curve.
  4. If the hair is long enough to reach the ponytail, use a second ponytail holder to secure the ends of the bangs. this will make the ponytail stay extremely well.
  5. I take small chunks of hair and wrap them around my curler, starting with the ends of the hair and rolling towards the roots. (This can be done around any round item that is the desired circumference.) Don't roll too tightly because now you need to pull the curler out of the hair. Carefully bobby pin the curled hair into place, positioning in front of the ponytail holder.
  6. Repeat with all of the hair that is in your ponytail.
  7. My hair is so thin that I don't have enough to go all the way around the ponytail holder, so I just cover the top and put fresh flowers on the bottom. You could use anything.
I cut the stems of the flowers to be about an inch or two. Making sure that they are not longer than the pedals. Then I use two bobby pins per flower and place them in an X over the stem.

Thursday, October 15, 2009

CSA

My sister just told me about CSA, Community Supported Agriculture. It is a system for getting farm fresh produce direct from the farmer instead of the grocery store. I have read a little bit about it and think that I will get signed up for it after we are all moved and settled next year. I post it so that I don't forget about it latter, But I also thought i'd share it with everyone to look into it for themselfs too.
Here is a site I found that shares a little bit of info on it and has a search tofind a CSA farm co-op in your area.
Sorry locals, There are no CSA's in our area!

Thursday, September 17, 2009

Although I spend a lot of time on other things, I spend my days with my 2 most important projects. My girls. Here is a slide show of Maggie's first year. I hope to get one done for Gwen too.


This slide show is very easy to do. You just go to

www.onetruemedia.com

and upload your photos and videos. They automatically put random transitions between each photo and you can make changes from there. They have a lot of free music to use, allow you to upload your own music, or buy music. But it does take a while to upload all your photos.

Wednesday, September 16, 2009

Today I made a shirt out of Kwik Sew Pattern # 3179. It went together VERY quickly!!! I cut the paper pattern out before Maggie nap and I was able to cut the fabric, and sew the whole garment before she woke up!!!

  • It is baggy around the arms, (That seems to be the intended style.)

  • But the waistline fits beautifully and shows off your shape.

  • The neckline is not too low and an underpinning is not needed, even when you bend over.

  • It is a little short waisted. I think it will work well with a highwaisted skirt, a coverup for a dress. Or length could be added with a flounce or ruffled trim around the bottom.

What I did differently/would do differently next time.


  • I didn't like the baggy short sleeves, so I gave them the same elastic treatment I did with the dress I posted about a few days ago.

  • I had some trouble turning under the curve on the hem around the neckline. Next time I will need to either use bias tape or make sure to stop stitching about a quarter of an inch from the end of the fabric at the shoulder seems.

Another little bit of pattern info I thought I would share is this website.


http://sewing.patternreview.com/news


I found it very helpful in choosing this pattern. I look forward to researching my future pattern purchases here.

Monday, September 14, 2009

Spinach artichoke pasta
Today for dinner we made a YUMMY Rachel Ray recipe
Spinach Artichoke Whole Wheat Penne

http://www.foodnetwork.com/recipes/rachael-ray/spinach-artichoke-whole-wheat-penne-recipe/index.html

It was SO good and I'm assuming healthy with the veggies and whole grain pasta.
Sam said he liked it okay, but then it must have grown on him because he laughed about taking seconds of a dish he labeled as only "Okay"
I LOVED it, especially how the flavors really soaked into the chicken we added to it.
Gwen didn't seem to give it much of a chance and decided before she tried it that it was yucky.
Maggie loved it and scarffed it down.
Making it our own:
We did alter the recipe just a bit.
  • We cut the recipe in half and there was still plenty left.
  • Also, we added 1 cup of cooked cubed chicken. That is what I loved so much about it. The chicken really soaked up a lot of flavor. In fact, we liked it so much that next time we will add 2 cups of cooked, cubed chicken. Because the chicken soaked up so much, I think we will need to add some more chicken broth or something.
  • And we put the artichokes into the food processor also.

What we didn't like:

  • The pasta didn't soak up much of the flavor. I am hoping that adding some more broth to the sauce and allowing the noodles to absorb the sauce for longer on the stove will help with that problem.

Thursday, September 10, 2009

Here is the cook book from my last post. I decided that I would do a review of the items that I try. Normally I just post the recipes that I like so I have an online recipe box, but decided that the publisher probably wouldn't appreciate me publishing all their recipes, especially if I post them exactly as seen in the book without making any changes.

Recipes we liked:

Applesauce with crispy scoops- these are the cinnamon sugar chips we made yesterday. We LOVED Them!!!

  • Crispy cheese chips-I liked these, Gwen said she liked the cinnamon sugar chips best. I think I will try the cheese mixture on french bread also.
  • Honey Crusted Chicken- We all liked these, but I wished I could have tasted more of the flavor. I think next time I make it I will let the meat marinade in the sauce overnight or something so the flavor will come out a little stronger. Also, I forgot to cut the chicken breasts in 1/2, so I had to cook it longer. (Thank goodness for meat thermometer :)
  • Parmesan Potato Coins-Sam liked these, Gwen did not, and I thought they needed some more flavor. I think next time I will buy an Italian seasoning blend instead of making my own, and I will add some garlic. If that does not improve them enough then they are getting bumped to my don't make again list. But the things we liked about them was that they were cooked just right. Not too soft or too hard and the leftovers could easily be put into a new dinner.

Recipes that we decided we wouldn't make again:

  • Morning Glory Muffins-they were not yummy enough to make the work of shredding the carrots worth while. But if you are desperate for your kids to eat veggies, this might be a good one to try. Gwen said she liked them and thought they were cupcakes.

Wednesday, September 9, 2009

Cinnamon Sugar Chips:

I found a kid's cookbook at the library this week and am excited to try a bunch of the recipes in it. today Gwen and I made a variation of a recipe they called Applesauce with cripsy scoops. The book is called


Kid Favorites Made Healthy
by Better Homes and Gardens
Ingredients:

2 tortillas
softened butter
cinnamon sugar

Directions
  1. Preheat oven to 375 degrees.
  2. Spread a thin layer of butter on the tortillas.
  3. sprinkle the cinnamon sugar on the tortillas.
  4. Cut the tortillas into 8 triangles each with a pizza cutter.
  5. cook the chips for 7-9 minutes
  6. allow to cool on a rack and eat with applesauce.

Personal note:

  • We LOVED these!!! they reminded me of some baked cinnamon treats I'd had before by Quaker.
  • I thought that for our next party we could get a cookie cutter to go along with the theme and make cute shapes like flowers, heart, Christmas trees... then, if the scraps don't burn, I could let Gwen graze on them before the party.
  • We cooked ours for 7 minutes because I was afraid of burning them. But they were not as crispy in the center as the edges, so I think next time i will go for the full 9 minutes.
  • They made the house smell SO good!!!

Saturday, August 22, 2009

A sign up sheet went around on Sunday at church that requested for people to share their talents. I'm assuming it is for an upcoming talent show or something. A few weeks ago I had ordered some sheet music for the Shirley Temple Song "On The Good Ship Lollipop" and have been trying to teach myself to play it and Gwen to sing it. So I signed us up.

But it reminded me of the last talent show I preformed in. Sam convinced me to do my old floor routine for a talent show we had at church when we were newlyweds. It was a lot of fun to do.

All the memories gave me enough of the gymnastics bug to dig out my old stuff. I played a VHS tape of a performance from my Senior year. While watching the videos I got out my camera and took some videos on it so we could have the performance in a digital format, however rough it might be.

Here is my bar routine. I have always LOVED bars and it was my best event.

My next favorite was floor and I did fine with that too.

Here is my vault. I do a front handspring, then a 1/2 on 1/2 off that actually looks like a 1/4 on 1/4 off. :) oops!

I was SO bad at beam, but we only had 8 girls on our team, so we all had to be all arounds. It terrified me every time I got up there. As you can see, I'm not so good at staying on. :S

I post them here on my project page because gymnastics was a great project of my youth. It shaped me into who I am through the lessons I learned in the gym. Also, if I find some time to practice and things look hopeful, I might consider signing up to do a watered down floor routine at the upcoming talent show.

Today Gwen and I practiced some skills in the backyard. It was fun, but the grass was itchy.

Baby girl afghan:
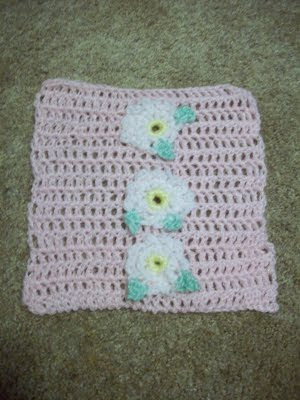
I've been trying to learn how to crochet for YEARS! Probably since I was a preteen. I've started many projects and quit most of then 1/2 way through because of all the mistakes and lack of patience. I've had many teachers, including: My Mother, my grandma, my grandma's sisters, my friend Aimee, and a TV show on public television called Knit And Crochet Today. I think I have finally combined all the things that each of them taught me to create a project I will actually finish. It is a project of my own creation because I decided that I just am not capable of following a pattern. I have about 1/2 of the blocks done and when I put the blocks together I will post a picture of the completed afghan.


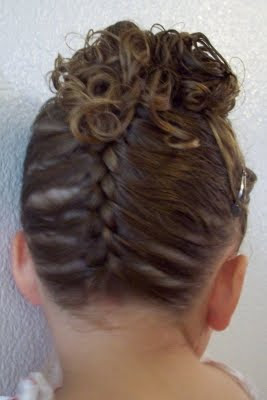
Here is another hair do:
I knew it would take some bobby pins, so I did it on Saturday so Gwen could take it out if she wanted to and I wouldn't get mad. I need to dig through my hair things and find some of my cute clips since there is one clip that is visible for the hair that swoops from the front to the side.


Styling tips for me:
To do this I parted the hair at the front first making the "bang" swoop. I clipped that down so it would dry smooth instead of curly. Then I made a part from one ear to the other ear and clipped it down. To do the braid I had Gwen get down on her hands and knees and I gave her some books to look at. Next time I think I would just pull out the portable DVD player and let her watch a movie because she was still moving a bit to turn the pages of her books. Once I reached the end of the braid I ponytailed it with the hair I clipped earlier. I wrapped some of the longer hairs around the ponytail base and then bobby pined the rest of the curls in place. Finally I positioned the bang swoop and clipped it into position.


Sunday, August 16, 2009

French Crown:
On Sundays we don't have church until 1, so I normally have plenty of time to give the girls a bath and do Gwen's hair. Sometimes I like to experiment with Gwen's hair, Today I came up with this updo. I thought it was cool and realized that it looked very appropriate for a flower girl for a wedding. (Hint hint to Uncles and Aunts, we are ready when you are ;) So I thought I would post it and offer up my hair styling skills to anyone who is interested. Right now I am not interested in making money off of it, I just enjoy doing it and would love to help.


I let Gwen watch an episode of Diego while I did it and the show was over about 10 minutes before I finished her hair. So it probably took me about 30 minutes to do the whole thing. But I would say that if I was doing this for someone the appointment would need to be a full hour, because I like to work with the hair when it is wet, so we'd have to wash the hair, style it and then if the hair is not curly like Gwen's, we'd need to curl it.
Styling notes:
I separated the hair into 5 sections. one long one across the top, one across the side and two across the bottom, leaving the fifth section in the middle. I clipped each section loosely with some crappy barrettes so I barely had to touch them to pull the Barrette out. (I didn't want them to be too tight because I needed to keep one hand on the braid at all times meaning I needed to remove the barrettes with only one hand.) I also did not completely braid the last section because it would have made the curly part off center, instead I french braided it only until I reached the center of the head and then I pony tailed it.


Monday, July 20, 2009

Our Garden/ more cooking trouble

In the spring I had the idea to plant a little garden that would give the girls and I something to do and hopefully teach us some gardening skills so, someday, when the navy is not moving us all over creation we can plant a big garden in a yard of our own.
We planted some sunflowers, pumpkins, and corn. They all seem to be doing well. In fact, I found a pumpkin plant growing next to the garbage can! I guess one of the seeds we through out didn't quite make it in. Despite Dad mowing over it and no care from us it has a blossom on it. We are excited to see what will happen with our plants.
For my birthday my mom gave me a cake decorating book. So yesterday I spent all afternoon and evening working on these petit fours. The cake turned out just fine. It cut up nicely, but The frosting recipe turned out badly. No matter how many times I poured it over the fours it just left this sad thin coating over them. Sam was nice and said they were good, but I thought they were just gross and soggy. I think next time I will either make a real ganache to pour over it, or use my regular frosting recipe.


Dutch Oven success!!!
This morning I made German pancakes in the dutch oven and it worked out great!!!
I got a great dutch oven book from the library that taught me 2 VERY important things.
  1. When placing the briquettes, always put 1/3 of them on the ground and the other 2/3 on the lid of the oven
  2. Rotate the oven during the cooking process. This will help it to cook evenly.

The book is called The Beginner's Guide to Dutch Oven Cooking

It called for:

  • 18-23 briquettes
  • 2 TBSP sugar
  • 1 cup flour
  • 1 cup milk
  • 6 eggs
  • 1/2 cup butter.
  • powder sugar to sprinkle on top when cooking is done.

Directions:

  1. While the briquettes are getting ready, put the butter in oven in a warm place to melt, and mix all the other ingredients together in a separate bowl. (make sure to start with dry ingredients, make a well in the center and then add wet ingredients.)
  2. When butter is melted, rotate oven to coat the sides and pour the remaining butter in the bowl and mix it into the batter.
  3. Pour the batter into the dutch oven, cover and place the briquettes with tongs so that 1/3 of them are on the bottom and 2/3 of them are on the top.
  4. Cook for 20-25 minutes. Being sure to rotate the oven about every ten minutes to insure even cooking.
  5. Before removing from the briquettes make sure the food is completely cooked.
  6. Sprinkle with powder sugar and serve.


Stick Name Tags:

When I was growing up, I got a stick name tag or necklace a few of the years I was at camp, so I made some for our girls. I put them on their water bottles in hopes that they won't use the wrong bottle and exchange germs. (All the bottles are the same.) The best part of the stick tags is that they are free! The worst part is that because I didn't have a table saw, it was a lot of hard work to cut them out. I had to use a hand saw, I suppose my arm muscles are better for it.

To make a stick name tag:
  1. Find a stick outside that is about 2 or 3 inches thick.
  2. cut the pieces so they are about 1/2-1 inch thick. (If you don't have a very big stick you can cut the stick on an angle instead of straight across. This will give more surface area for the name.)
  3. Use a drill and make 1 hole in the top of each piece.
  4. Write the names on the wood with a permanent marker
  5. use ribbon, yarn, raffia or leather ribbon to make the necklace or attach the tag.

Wednesday, July 15, 2009

Burned Yet again!!!

Yesterday I went to the storage unit for camp and pulled out some "real" cooking items so I didn't have to keep using my solar oven. I tried to make some rolls in the dutch oven. They turned out good, except for the fact that they were burned badly on the bottom. (Good thing I'm practicing so much before we go camping, otherwise these girls would be loosing a lot of weight at camp.)
I don't know the exact reason they burned. I think it was because I had too many briquettes on the bottom of the oven, or because of the foil reflecting heat under the oven. (I put the foil down so i didn't ruin the patio.) I am going to try again soon with less briquettes under the oven.
Another unsecsessful cooking project:
I decided to try something that seemed to need a little less heat before I was willing to toss out my solar oven. (Mostly because I spent a LONG time making the stupid thing.) So I used one of the recipies that was in the book that I found the directions for the oven. It was a granola bar recipe.

Ingredients:
3 cups of quick oats
1 can of sweetened condensed milk
3 TBSP butter
1 cup chocolate chips
1 cup butterscotch chocolate chips
1 cup crasins (dried cranberries)

Directions:
  1. Let the oven heat up in the sun for a 1/2 hour.
  2. Grease a muffin tin with 1 TBSP of the butter.
  3. mix the rest of the ingredients together in a bowl.
  4. spoon mixture into muffin tin and press.
  5. place in oven, cover with plastic wrap and cook for 20-30 minutes.

Results:

  • I was a little sceptical, so I did the same thing in the indoor oven at 200 degrees.
  • Both ovens cooked the tops cooked just fine, but the bottoms were still all gooey. So I emptied the muffin tins and spread the filling over 2 cookie sheets all broken up. This seemed to work just fine.
  • I can't say an exact time to cook it at because I accidentally forgot it was in there and preheated the oven for dinner. Only to find it burning when I put tried to put my dinner in. :) One tray was actually salvageable and didn't burn too bad. I ate it after the girls were in bed and decided that I would try it again another day.

Game plan:

  • Forget the Solar oven: Sounds like Stacy would have told me to do this before I began this process :)
  • Make another batch and just spread it out onto 2 cookie sheets. Put one in the sun and another in the oven for 20 minutes. After 20 minutes check on them and go from there.

Sunday, July 12, 2009

Solar Oven:

Today I tried to make brownies in a solar/reflector oven. It didn't quite work out. In fact, it was a complete failure. I got the directions for making the oven in a kid's book called cooking in a can. And I used a recipe from another book. I was SO disappointed, I put some brownies in at 11am and when we got home after church at 4, they were still basically batter. I think we will need to build a fireside reflector oven if we try this again. (I have some directions for one of those in another book.)

Saturday, July 11, 2009

Ball-Toss Ice Cream
Equipment:
  • 2 (1 quart) zip lock bags
  • 2 (1 gallon) zip lock bags
  • 1 (8lb bag) of ice
  • 1/2 cup rock salt
  • newspaper
  • heavy duty tape
Ingredients:
  • 3/4 cup whole milk
  • 1 cup whipping cream
  • 1/3 cup sugar
  • 1/2 tsp vanilla extract
  • 1/4 cup Nesquick chocolate or strawberry powder flavoring (optional)

Directions:

  1. place all ingredients (Milk, cream, sugar, vanilla and flavoring) in one of the quart sized bags. Squeeze out all the air, seal the bag and swish it around a bit to mix everything well.
  2. Place the bag inside of the other quart sized bag and seal it.
  3. put some ice into the bottom of one of the gallon sized bags, filling it about 1/2 way. Put the quart sized bags on top of the ice, then filled the rest of the gallon size bag with ice.
  4. sprinkle the rock salt over the ice inside of the bag and seal the bag.
  5. Put it inside of the second gallon sized bag and seal it.
  6. Wrap the bag with a lot of newspaper and strong tape like duct tape or packing tape.
  7. Toss the ice cream ball for about 15-20 minutes.
  8. Unwrap and enjoy the cream. (Makes about 3 cups)

This was yummy! We made the chocolate ice cream during our babysitting swap this week and the kids had a great time. Sam really got in there and played with the kids to make sure the ice cream was good. They did a solid 20 minutes of tossing around the ice cream ball. It was so yummy we want to try the strawberry one for FHE. We might even try it with dry milk.

Brown bag breakfast:

Ingredients/tools-1 serving per bag

  • 2 strips of bacon
  • 1-2 eggs
  • dry brown lunch bag
  • salt and pepper
  • BBQ briquettes
  • Tongs

Directions:

1.)Prepare your BBQ briquettes or fire.

2.)Line the bottom of the bag with bacon. The grease moistens the bag and keeps it from burning.

3.)Crack eggs on top of bacon. If you like scrambled eggs stir them in a brown, then poor into bag.

4.)Season with salt and pepper, then fold down top of bag 3 or 4 times, being sure to stop folding before you reach the food.

5.)place bag on prepared BBQ briquettes or coals of fire for 10-20 minutes. Food is done when eggs look cooked.

We tried this recipe this morning and liked that it was simple. we cooked our bags for about 15 minutes. Parts of the eggs seemed to be a little rubbery and other parts, though cooked, were a little to runny for my taste. I think I will try it again in a few days with scrambled eggs to see if they cook more evenly.

Also, the bottom of the bags were a little bit burned and stuck to the food. I thought it would be hard to peal it off, but it wasn't too hard.

The only thing I didn't like was that the bacon was floppy. Sam likes his that way, but I prefer mine crispy.

Friday, July 10, 2009

PJ Pants for Girls camp:
I have not been posting any new projects recently because most of my spare time has been used for girls camp! These are the PJ pants we have been working on. Last night the girls got to sew their pants together. It was a great activity and it seemed like everyone had a fun time, no one got too frustrated and I think all the girls but one finished their pants!

I began this PJ pant journey last month when I was told that it is a tradition in our ward to have matching PJ pants at camp. So I looked at fabric on line, pulled an old pattern out of my pattern box and it took off from there.

I did the math and according to the pattern, we needed to have 47 yards of fabric! So I knew I couldn't just go down to walmart and buy it. I went online and found Joann fabrics to have the best prices. I showed the girls about 8 different fabric choices and everyone had a different favorite. but this striped fabric seemed to be something that everyone at least said that they liked, even if it wasn't their favorite. By the time I ordered the fabric it wasn't on sale anymore, I used a coupon, but it was about $1 more a yard than it would have been if I had got it during the sale.

After I ordered the fabric, I was reviewing the receipt so I could turn it in to be reimbursed. And then I noticed that they were only going to send me 27 yards! that's a little more than 1/2 of what I needed. I decided that I would just take a trip out of town to some JoAnn Fabric stores in the area to get the amount I needed.

We had planed for the activity to be last Thursday, but Thursday came and I didn't have any fabric on my doorstep. So I called and they said that someone else ordered the fabric the same time I did and it turned out that they were only going to be able to send me 25 yards of fabric. And that is what delayed the order. So I had to make some quick phone calls and inform everyone that the activity would be switched to next week. Just in case there was another shipping problem, I went out of town that weekend to get the extra fabric I needed.

I washed it and began cutting out the pieces for each girl to have a pair to sew at the activity. Even though I had gotten some extra fabric, I was still 7 yards short. So I came up with a creative cutting idea. Instead of following the pattern, I cut the fabric from salvage to salvage. This made the stripes go vertical instead of horizontal and used less fabric per piece. The only problem was that it was a few inches too short. So I made some pattern directions to sew a decorative trim for the hem instead of just folding the bottoms in and stitching them in place. Another benefit of having the salvages at the waistband and at the hem was that the girls didn't need to worry about double folding them when they sewed to keep them from unraveling (saving fabric and time.) I also made little name tags for them to sew into the pants so they don't get their pants mixed up at camp. The fabric I ordered arrived a few days before the activity. So I washed a bolt of it and we used it at the activity.
Things went VERY smoothly at the activity. I couldn't believe how UNstreesed out I was. I was sure I would be going crazy the whole time. But we had 1 adult to each girl, and a few adults who were non-sewers. So I spent most my time supervising. our Non-sewers brought refreshments, fans, power strips, extension cords, and basically set up the room for me. We used the long banquet tables at the church and had 2 machines at each table. We had 8 girls in total making their pants.

I have 2 1/2 bolts of the fabric left. I still have to make pants for the girls who were not at the activity, for the leaders, and something for the priesthood that will be at camp. But I think I will still have about 1 bolt left. I am trying to figure out what to do with the rest of the fabric. Should I not turn in 1 of my receipts and keep the fabric and if so, what should I make with it? Or should I turn in all the fabric receipts and save it for next year so they can make pants for just the new girls and the girls who went this year can bring the ones they made this year?

What would you do with a bolt of cute stripe fabric like this?

Monday, June 29, 2009

All Boy:
My Sister asked me to make a nursing cover for a friend's baby shower. after looking on her registry this is the design I came up with. I like it a lot, but decided that the dog is too much work to be done unless it is specifically requested.

I tried to applique the dog out of some cotton fabric I got at walmart and it was not going so good. so I went back to look for fleece or felt because I knew they wouldn't frey. But the selection at our store was so small I couldn't find anything close to what I was looking for. So I ended up going to the thrift store and buying a fleece holiday sweater and a little boy's fleece vest to use as my fabric.
For each nursing cover that I make I always make a bag to store it in. It is large enough to store the nursing cover and a baggie with a handful of breast pads.

Also, I now have directions on how to store the nursing cover. I had Gwen be my model. I was trying to get her to hold it in a particular way and she was having a hard time. Forgetting that she is just 3 years old I got frustrated and she began to cry. I felt horrible and had to take a break to tell her she was doing a great job. If anyone who already has a cover wants the storage directions just let me know.


Saturday, June 27, 2009

Sophisticated Momma:
I was going for a dressier look on this nursing cover, The main fabric is a sage green with a swirly floral design woven into the fabric. The neutral colors make it sort of gender neutral and more like a Mom accessory than a baby accessory.


Wednesday, June 24, 2009

Homemade Fruit Roll ups

My friend Rachel, the domestic diva, told me how to make fruit roll ups this week and we have made them several times. It's so easy!

1.) Clean and core some fruit. (We did Cherries the first time and Apricots the second so we had to pull off the stems and take out the pits.)

2.) put the fruit in the blender and puree it. (The cherries were easy, but the apricots were so big and thick that we needed to add a few tablespoons of juice from the fridge before the fruit would start blending. We used cranberry-pomegranate juice and it was yummy!)

3.) tape some plastic wrap to a table outside in the sun on a hot day. (If it's not a nice day you can put it in the oven at 200 degrees.) Let the fruit cook in the sun all day. (it's hot enough here that if I put it out before noon the fruit is done before the sun goes down.)

4.) Once the fruit is dry and leather like all over you get some scissors and cut the fruit with the plastic wrap still attached into squares to be stored in a gallon sized zip lock bag. the fruit is good for up to 5 years!!! Gwen and I LOVE it!!!